goldnrust
West Midlands
Minimalist
Posts: 1,872
|
|
|
|
It's a bit old to be retro, but you do 'ride' a motorcycle, so I'm gonna say that's a tenuous enough link to justify writing up what I'm doing with this old bike. Over the past decade I've bought progressively older vehicles, and at each step enjoyed the new challenges and experiences that came with driving them. Last spring, as my Fiat 500 project was wrapping up, my brain (as usual) was already thinking of the next automotive 'thing' to get excited about. I knew I didn't have the time or space to be taking on another car, and I was certainly not ready to move on from the 500 to make space, and so I was thinking a motorbike to tinker with. I've toyed with the idea of owning an old British bike many times, but never followed it through, and originally I was looking at options for 50's bikes. The more I read into it though, the more the idea of an even older bike appealed to me. Something that would be a whole new riding experience to anything I've owned and would be an exciting new challenge, much as learning to get the best out of the non-synchro gearbox in the Fiat 500 was/is! Several weeks later I'd got my wish list. I wanted a rigid framed, girder forked bike. I've read lots of things about how a rigid frame bike rides, how it feels different to a bike with suspension (some of it on glenanderson's bantam thread on here!), the girder forks was less about practicality and more because they just look interesting! haha. I wanted a bike with hand gear change, as part of making the riding experience different to anything I'd had before. I also decided I'd prefer an OHV bike, rather than side valve. From an aesthetic point of view, an exposed valve OHV engine is just so cool, seeing all the moving parts go round, it has fascinated me ever since I first saw an engine like this as a child. Secondly from a practical point of view, the OHV engines would perform better than the side valve engines and so it seemed I might have a better chance of keeping up with modern traffic where necessary! On that same performance front I was thinking of a 350 or 500cc bike. I looked at various bike options, many of them more expensive or desirable than my little BSA, but when I saw this bike come up it just seemed like it fitted the bill perfectly. It had all of the features I wanted, just all in a bit of a smaller package being only a 250cc. Crucially, given this is all just an experiment and I could end up hating riding it, it was also a much more affordable way into pre-war machinery than lots of the other bikes I considered. So in June, this old bike got dropped off at my house. I'd bought it 'blind' from the other side of the country, presuming it would be a project and need complete overhaul (which is does!) so I figured I had nothing to loose by just paying to have it delivered to me! Excuse the poor pictures they are video stills. 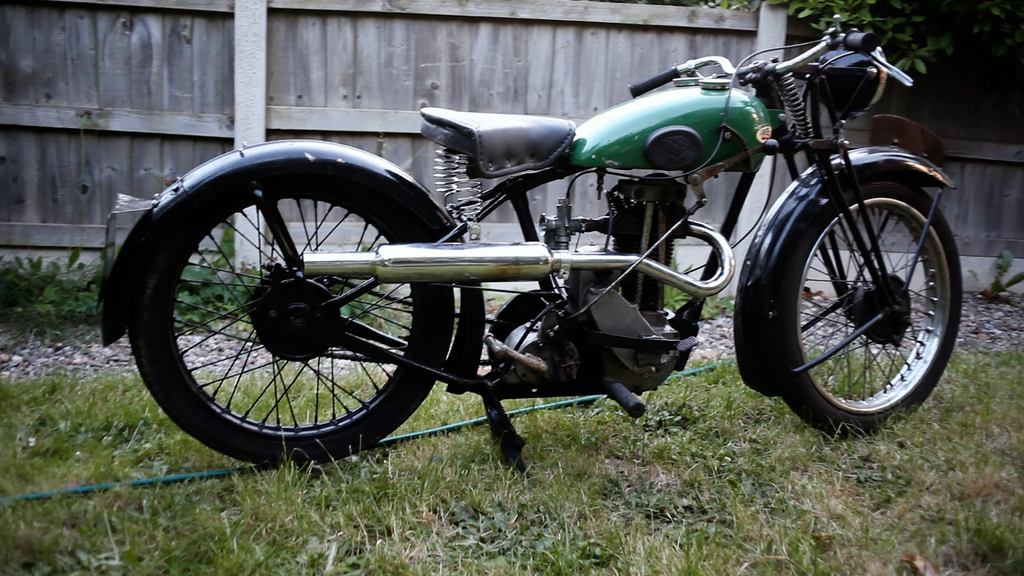 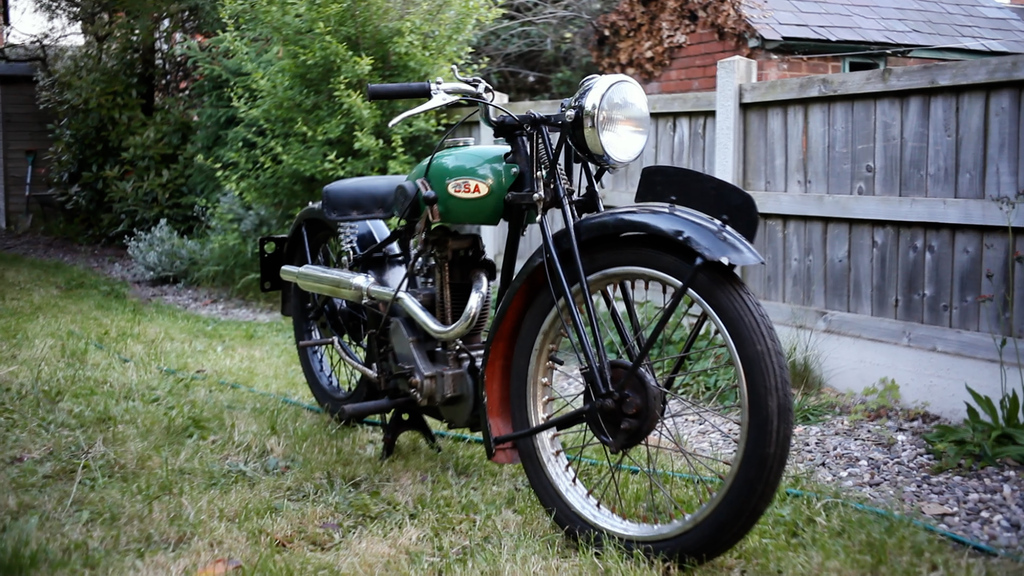 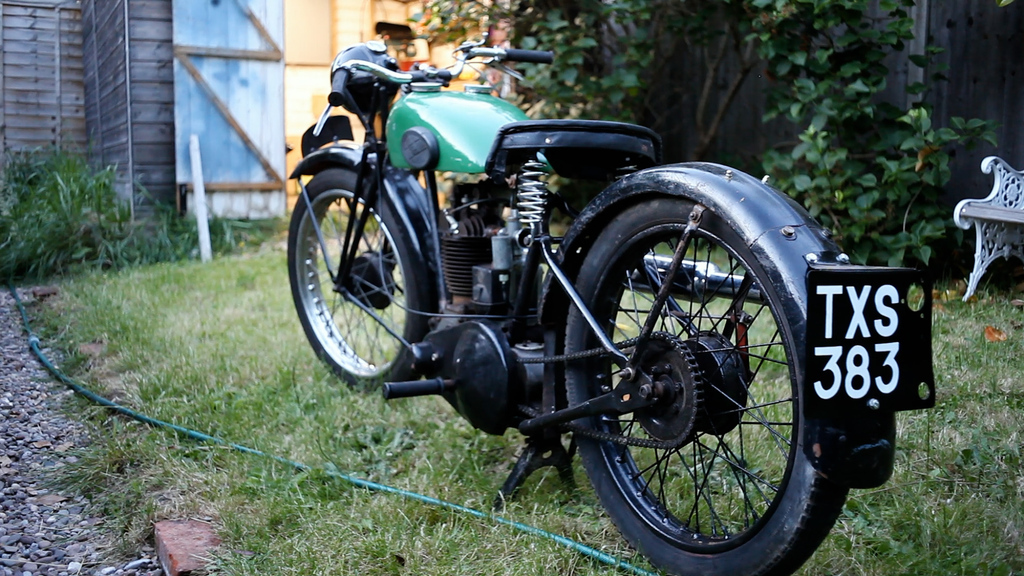 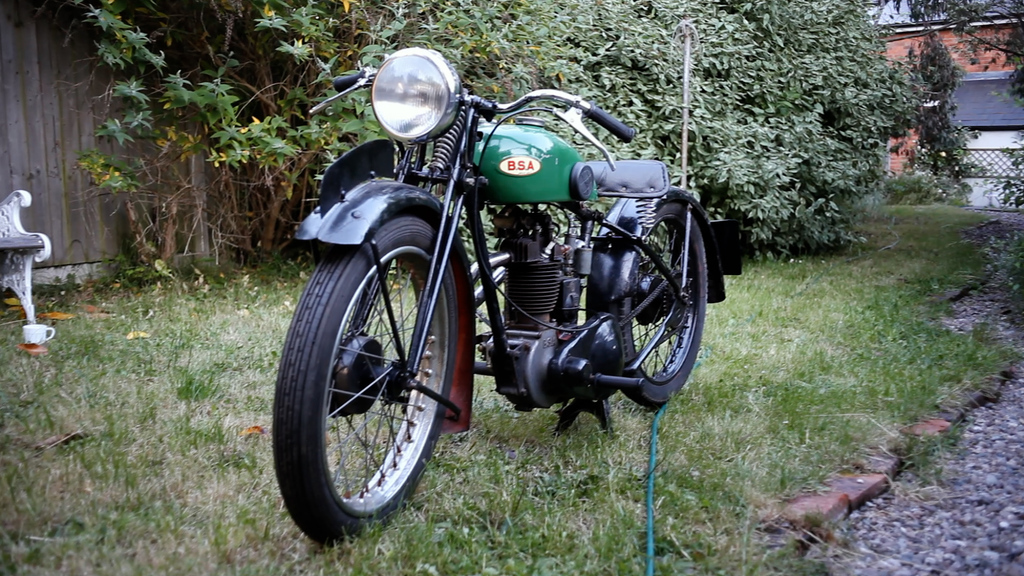 So what is it? It's a BSA B34-2, sometimes called a B2. The 'B' means it's from BSA's 250cc single cylinder 4 stroke range. '34' means it was made in 1934 and the '2' designates that it's the 2nd model in the range. In this case the B1 model was the basic side valve variant, cheaper and slower than the OHV B2 model. There was also a sportier B3 model the 'Blue Star Junior'. I'm pretty sure this bike is a 'bitsa', there's a lot of parts that are mixed and matched and not original. The exhaust and rear frame stays I believe are B-3. The tank is from a newer model, possibly 36/37? The front wheel had been rebuilt on to a rim wider than the back, which I'm sure is great for handling?! Possibly the whole wheel is a transplant from a different BSA of the same era. There's lots of small parts missing, for example there's a piece of string holding the ignition advance in place, instead of a cable running up to the handlebar controls. Everything is also a bit off centre/ not quite straight! 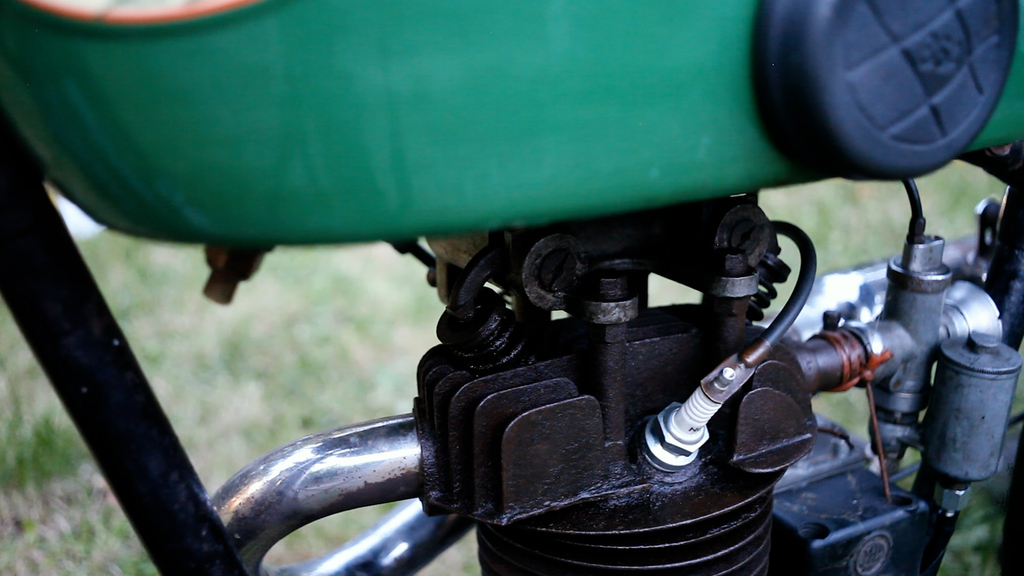 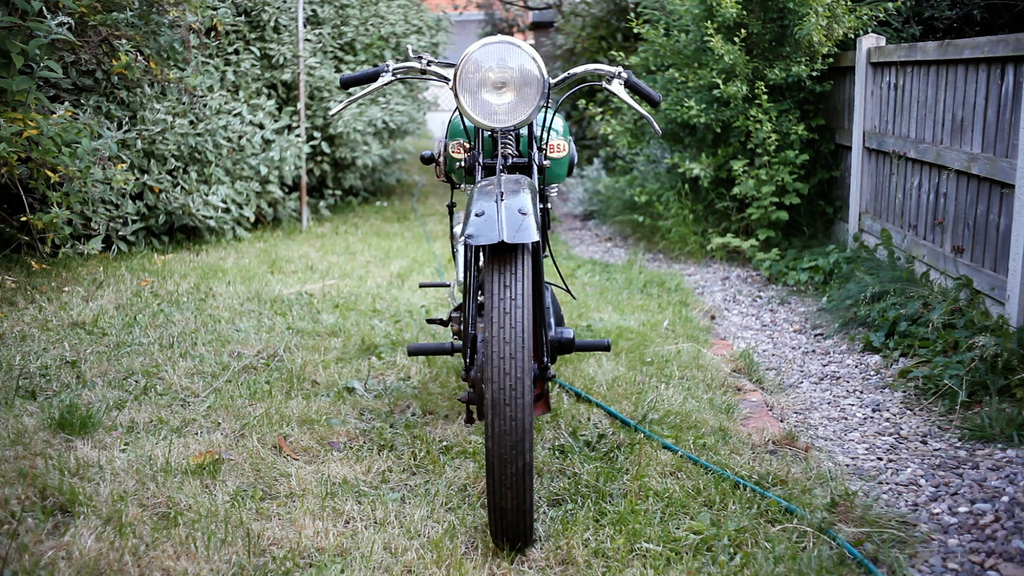 On the upside I saw videos of it running (poorly!) and all the major components are there and vaguely functional. There is basically no support for pre-war BSA bikes. You need to find parts secondhand (which being the best part of 100 years old are rarely better than the parts you have), make it yourself or adapt it from something else. So having a starting point where the major components aren't too bad is certainly helpful. Handily many of the cycle parts are fairly generic and so finding replacement wheel rims, spokes, tyres, cables, levers, etc is all possible. But other parts are nigh on impossible to locate. Given my bike is already a hodge-podge of various models, I have no history for it and my goal is to ride it to not polish it, originality is not of concern to me. I would like parts to look broadly in keeping with the era and the style of the bike though. This is not a restoration, it's a mechanical overhaul in readiness to ride. I love the oily-rag survivor look, and so nothing will be painted or cleaned up that doesn't have to be as part of making it ride right. 🙂 I started off aiming to do a bit of fettling to get the engine running a little better, stick some new tyres and cables on it and then go out riding and see what might want fixing from there, but as expecting within a couple of days things had escalated... 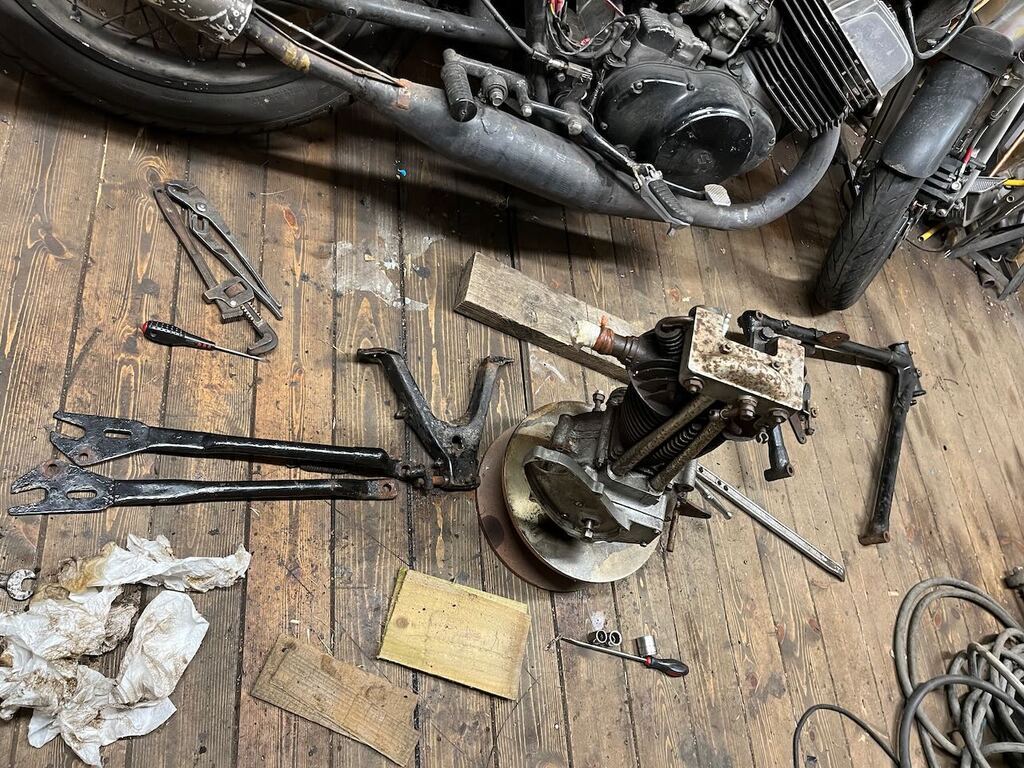 Ultimately the right move was to pull the whole bike to pieces (it's not a complicated bike so that took all of a couple of hours... ) and make sure every part is working right before putting it back together. In the months I have been working on it I've found endless problems, and I'm far from finished so there will be more problems to find, so I'm glad I took this approach. I've not really worked on the bike in a linear fashion, I'm dotting around working on bits that take my fancy, or working till I hit a roadblock then side stepping while I figure out how to solve the problem, but I have pretty much completed the engine so next post I'll go over what that entailed. 🙂 |
| |
Last Edit: Feb 12, 2024 9:51:08 GMT by goldnrust
|
|
|
|
|
|
|
Feb 12, 2024 10:09:10 GMT
|
|
I know very little about motorcycles but that looks really cool, I love the pedestrian slicer front number plate and the exposed rockers!
I had a lot of small mopeds and a few motorcycles when I was a kid to mess around on, it was the next step between bicycles and cars for me but I never had one on the road which for me is probably a good thing :-)
Bookmarked and waiting for the next installment.
|
| |
|
|
zeberdee
Club Retro Rides Member
Posts: 943  Club RR Member Number: 2
|
|
Feb 12, 2024 10:19:39 GMT
|
|
Really liking that .
I always look at bikes like that , but never had the courage to buy one , too far out of my comfort zone .
I’ll definitely follow this , think my plans (if i owned it) would be very similar to yours .
👍
|
| |
|
|
jimi
Club Retro Rides Member
Posts: 1,827
|
|
Feb 12, 2024 11:33:47 GMT
|
👍 Nice 😎 Back in the late 60's I had a B40 like this for a short time  Great bike to ride  |
| |
Black is not a colour ! .... Its the absence of colour
|
|
goldnrust
West Midlands
Minimalist
Posts: 1,872
|
|
Feb 12, 2024 12:28:13 GMT
|
Cheers chaps. I hadn't done a thread on the bike previously as I just thought it was a bit far from the usual RR thing to have been of interest, but as that seems not to be the case I'll be sure to keep the updates coming. homersimpson, 2 wheels was where it all started for me. I went from bicycles to motorbikes and had no intention of learning to drive a car, it was only after a few long winters of commuting, on my very sensible (not) Ducati 748, that I decided I'd get a car, and it was only going to be for when the weather was too bad for the bike... zeberdee, It being out of my comfort zone is where the challenge/excitement lies for me in a vehicle like this, haha. jimi, a cool looking bike there, and much more along the lines of the sort of thing I was originally thinking I might like before I fell down the rabbit hole of pre-war bikes. haha |
| |
Last Edit: Feb 12, 2024 14:50:32 GMT by goldnrust
|
|
jimi
Club Retro Rides Member
Posts: 1,827
|
|
Feb 12, 2024 12:55:58 GMT
|
jimi, a cool looking bike there, and much more along the lines of the sort of thing I was originally thinking I might like before I fell down the rabbit hole of pre-war bikes. haha Wrong jimi 😉 my username is jimil You would have liked the B40, not fast but got there quick, just a nice bike to ride, somehow felt bigger and more powerful than it was. very short stroke engine with an enormous (relatively) diameter piston, something like a 70mm stroke and a 80mm bore I think. Hopefully your B34 will be good to ride as well |
| |
Black is not a colour ! .... Its the absence of colour
|
|
|
|
|
Feb 12, 2024 14:56:08 GMT
|
|
I’ve had a lot of vintage bikes but quail in terror at the thought of trying a pre-war era machine. Good luck to you and have fun!
|
| |
More vintage bikes than cars
1959 Fiat 500 Nuovo America
|
|
goldnrust
West Midlands
Minimalist
Posts: 1,872
|
|
Feb 12, 2024 15:07:59 GMT
|
Right, engine time! Hopefully this wont be too patronising and I'm far from an expert, but I'll go over over a bit about the engine, and what makes it a bit different from a modern bike's engine. 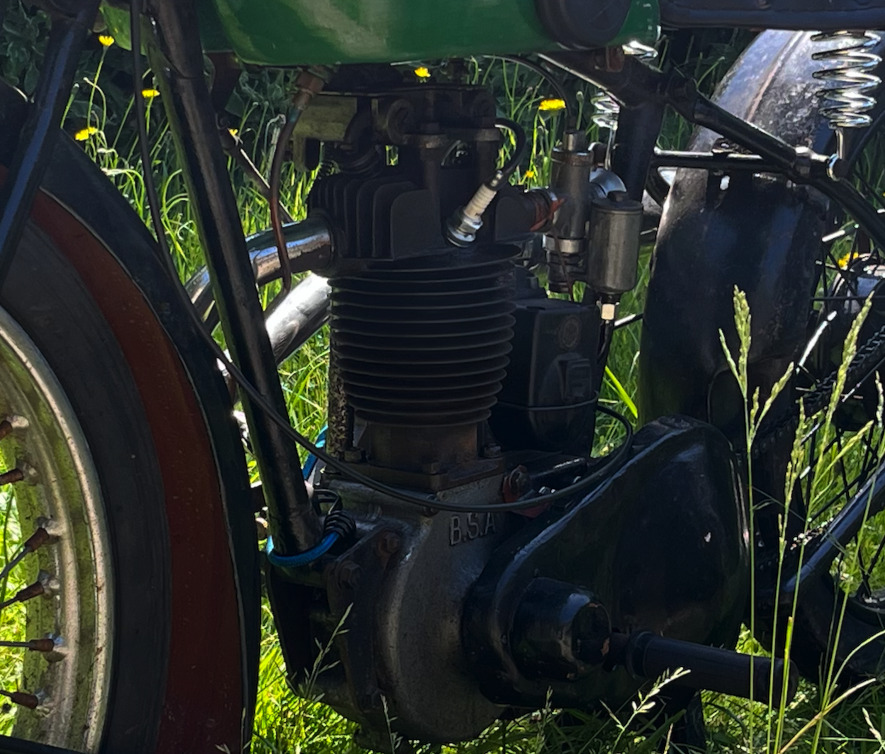 So as mentioned in the first post, the engine is a 250cc single cylinder 4 stroke. The bike is rated at 2.49hp, but that is not the true power but the tax or RAC horse power. At the time vehicles were taxed based upon a calculation that took into account the cylinder bore and number of cylinders and came up with an estimate of the power. The calculation was about right in 1910 when the system was introduced but as time went by and engines got more efficient it was not very relevant. From what I have gathered online my bike will probably make between 8-10hp, and top out at about 60mph, maybe 65 with your head on the tank, downhill with a tail wind! So not that dissimilar from a more modern learner 125 bike. As an aside, the tax horse power, which was brought it partially to make owning a big American car expensive and protect the british car industry, penalises cars with large cylinder bores. This is partly what drove manufactures of British cars to make long stroke low revving engines that are characteristic of the time. It is also the root of many car names, for example the Austin 7 being in the 7hp tax class. Anyway, history lesson over, where was I... The engine is a pre-unit construction, so that means unlike a modern 'unit' motorcycle, the gearbox is separate from the engine. The engine drives the primary chain, which in turn drives the gearbox. It has a total loss oiling system that provides splash lubrication only. There is a 'pilgrim' oil pump on the side of the engine, driven by the cam gear, which drips a little oil in to the bottom of the crank case. Approximately 1 drip ever 10-15 seconds at idle, up 1 drop every 4 seconds or so when at operating speed. This oil is flicked up by the flywheels on the crank and spread about inside the crank case where it will drip down on to the bearings and other surfaces to be oiled. Excess oil will be spat out through the crank case breather on to the primary chain (a design feature to keep the chain oiled) or will go up past the piston rings and be burnt. The owners manual says to set the oil pump based on the amount of blue smoke coming from the exhaust! Clearly it is intended for some oil to exit via the exhaust, as this is the only source of lubrication for the exhaust valve guide. Speaking of valve guides the valve and rocker assembly, as there is no pressurised oiling in the engine, their only source of lubrication is manual greasing. Each rocker had a grease port, as does the inlet valve guide, but as mentioned the exhaust valve guide does not. It's also recommended to put a smear of grease between the tip of the rocker and the top of the valve. This needs to be done every 250 miles according to the manual, but I suspect I'll just make it part of my regular routine and it will be done more often than that! Ignition is supplied by a magneto, in this case a Lucas Maglita which is a combined magneto and dynamo. It's the big boxy unit at 10 o'clock to the engine is this photo. It's driven by a chain from a sprocket attached to the inlet cam. You can also see the oil pump with it's sight glass in this picture, mounted to the outside of this chain case. 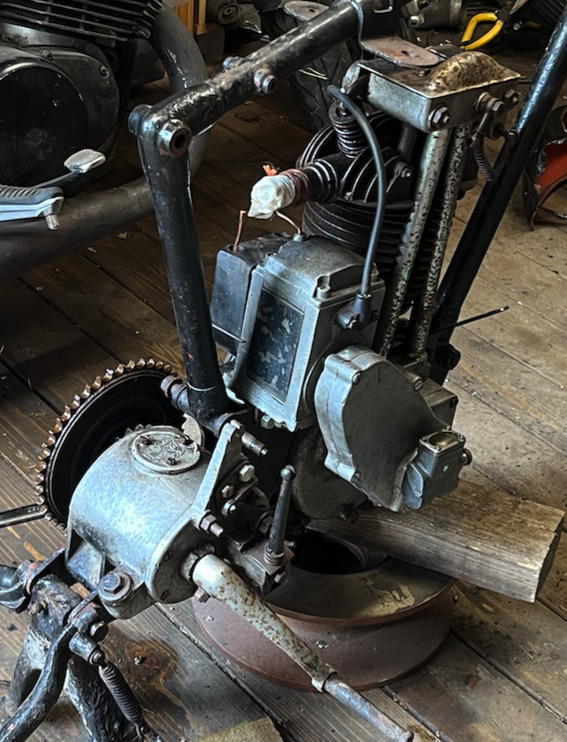 The Maglita is a very early design of mag-dynamo, first used in 1923 and was, much like the total loss oiling, pretty antiquated by the time it was used on this bike. It would generate a spark and about 16w at 6v when in as new condition. One of the flaws of the design is that the energy drawn by the charging system interferes with the magnetic field for the spark generation. So if you put too much of a load on the charging system, e.g.switching on a more powerful headlight bulb, then the spark intensity reduces. While a flawed system, it was quite the revolution in the 20s as electric lighting was a big step up over acetylene lamps! There is a valve lifter fitted, which when operated holds the exhaust valve off its seat. This performs two functions. Firstly it makes it easier to get the engine past TDC when preparing to kick it over to start, though this is much more relevant to a larger capacity bike and even feeble people like myself wont struggle to kick the 250 over. Secondly, and importantly, as the spark is self generating with the magneto and there is no electrical cut out, lifting the exhaust valve and therefore stopping compression is the most efficient way to switch the engine off. No keys, no locks, no ignition switch, so yes I will be taking a chain with me anywhere I might go on it! haha. So we know what the engine’s meant to do… let’s take a look inside. I figured I would be at least stripping the top end down for a clean up and de-coke. The oil burning nature of the design means that the owners manual suggest a de-coke every 2,500 miles. Pulling the head off I was pleasantly surprised to find it all looking pretty clean in there. 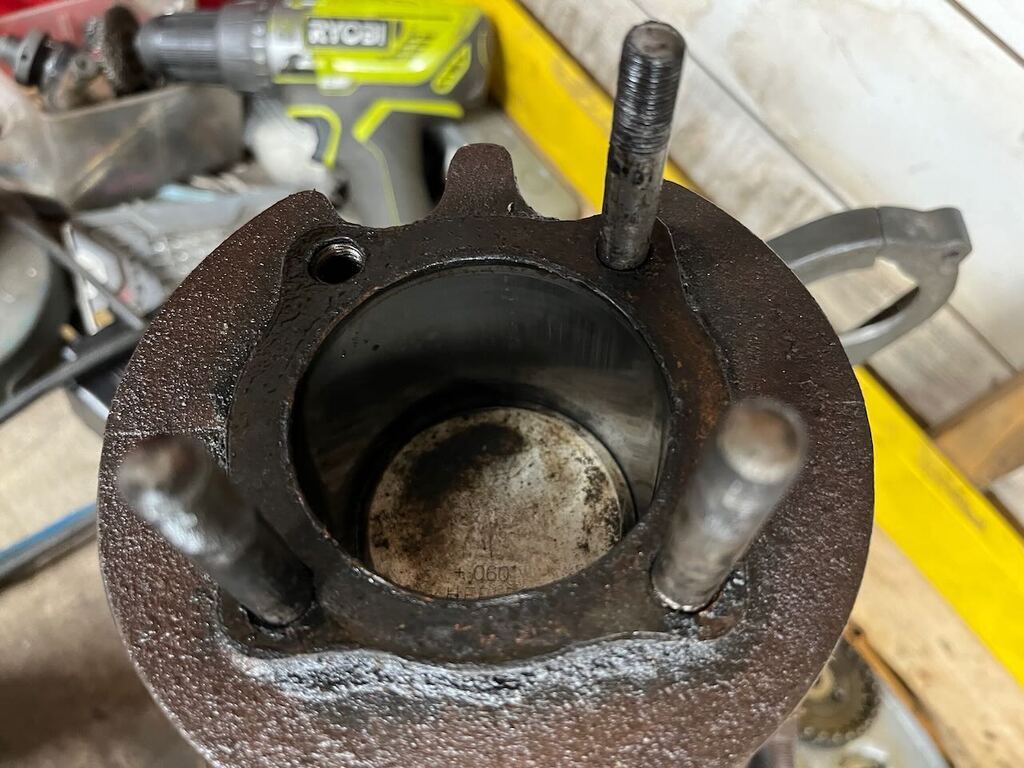 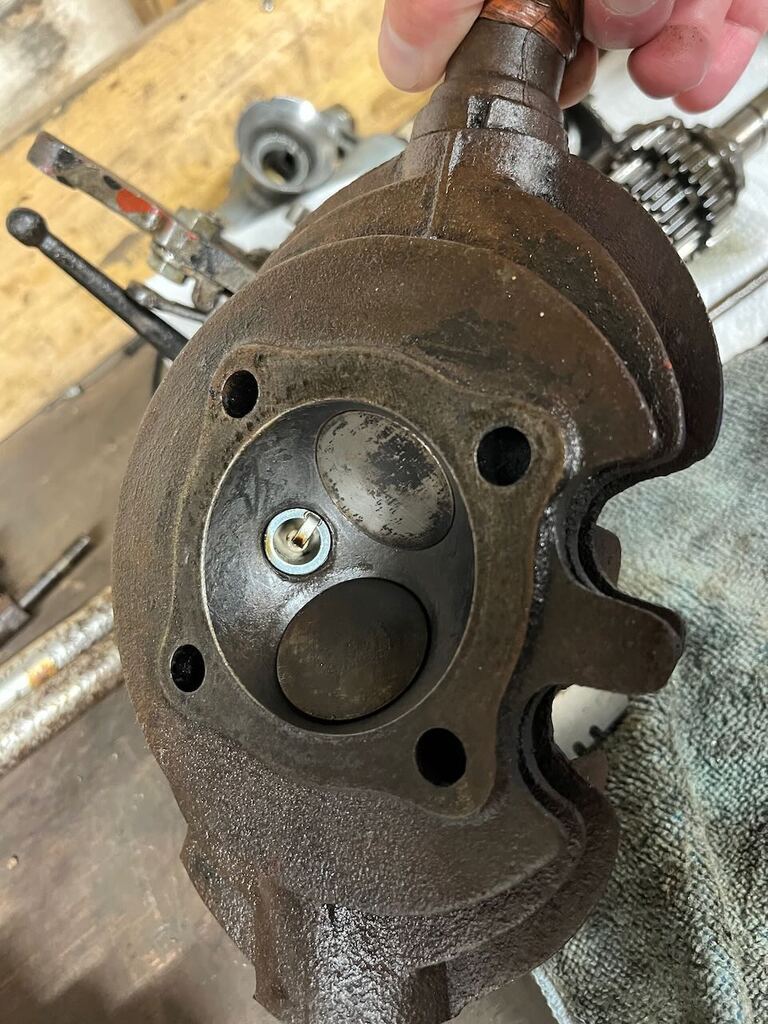 I suspect that somewhere along the bikes 90 year life, someone did start to get the bike fixed up and ready to ride but for whatever reason didn't finish it. There's various signs of this from a new front tyre (now too old and hard to be sensible to use) to a new reproduction seat cover, seat springs and headlight unit. In the head the valves look clean and are seating nicely, but the guides are definitely worn and loose. The piston is a +60 Hepolite branded item, one of a couple of different Hepolite pistons I've seen suggested to be used. The bore is quite shiny without much sign of honing marks, a little light vertical scoring (surely a given when running an open bell mouth carb on a road vehicle with the amount of dust and debris that must pass through the engine) but no damage to speak of and no sign of a wear lip. There is some bad news though, turning the engine over with the drive gear, I can feel vertical play in the con rod assembly. Not lots, but its there and theres a knock sound if you rock the crank. So there's nothing for it but to pull the engine completely apart and asses each part. 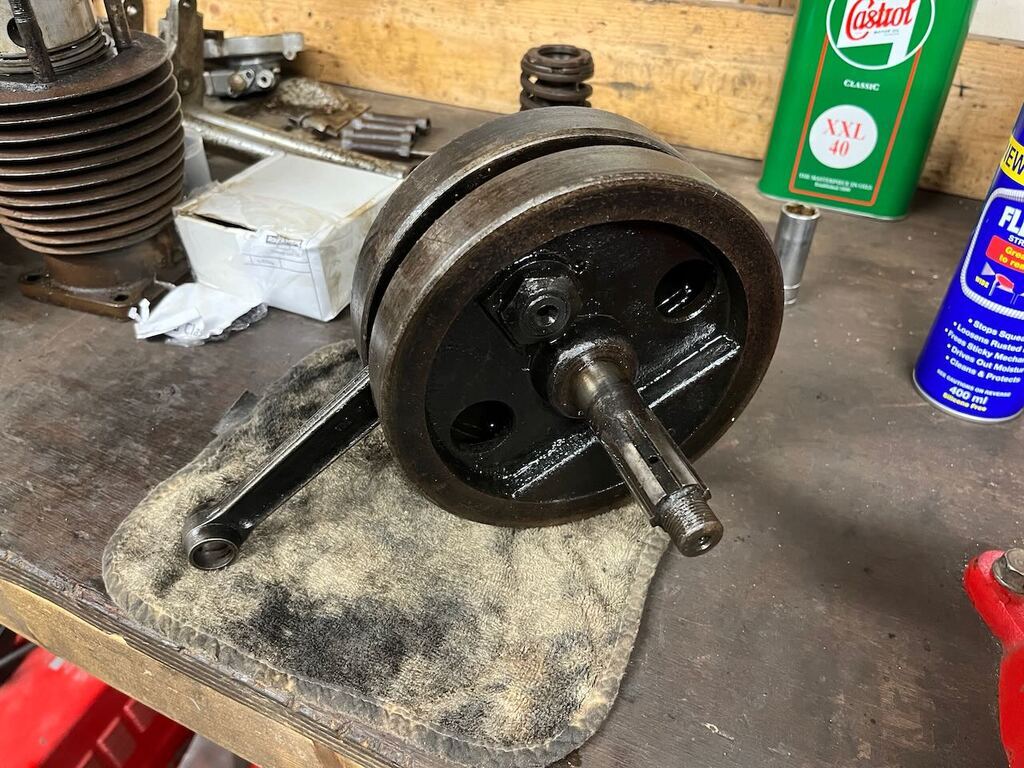 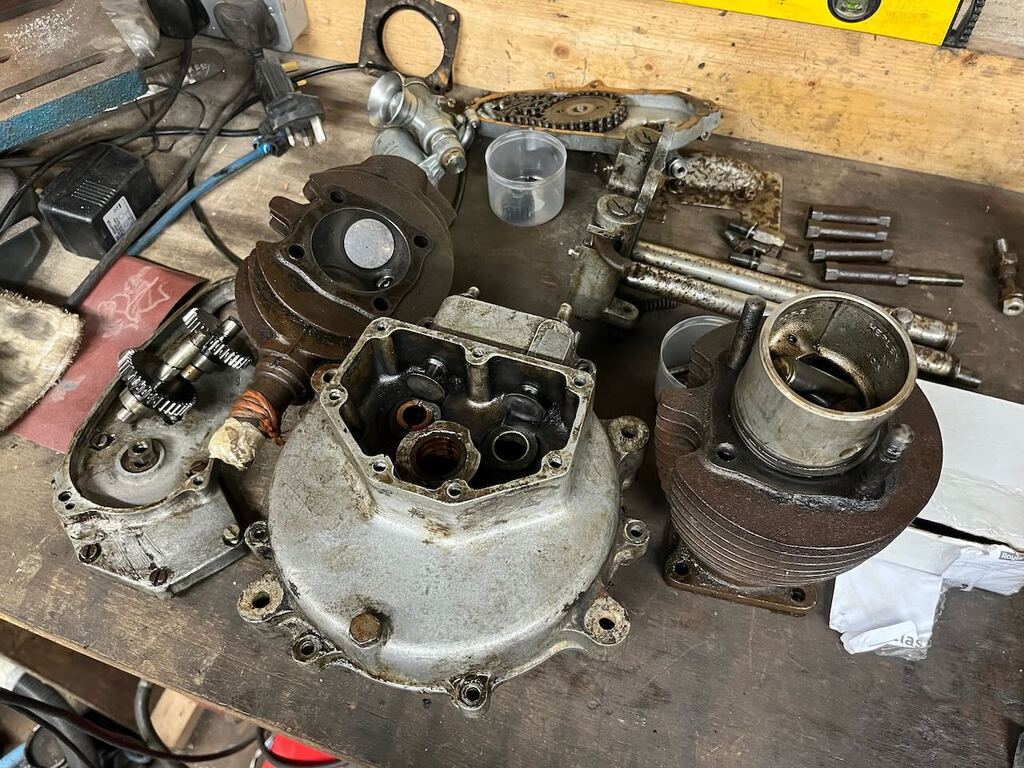 That was easy! Fixing it wont be quite so simple haha. |
| |
Last Edit: Feb 12, 2024 15:11:53 GMT by goldnrust
|
|
|
|
|
Feb 12, 2024 15:27:42 GMT
|
|
I would be interested if you have any detail of bits you did on a lathe, i've just got my dads old 1940's myford working and it would be good inspiration of things I could do with it.
|
| |
|
|
glenanderson
Club Retro Rides Member
Posts: 4,121
Club RR Member Number: 64
|
|
Feb 12, 2024 20:17:52 GMT
|
Did somebody mention my name?  Interesting stuff. I do have a soft spot for bikes like this. Looks like fun, and I will be following with interest. My only foray into "rigid and girders" territory was this 1948 BSA M33, a 500 cc OHV "heavyweight", with about 30bhp (by the time I had finished with it, 24bhp as standard). I owned it for about a decade, constantly fiddled with it, but never really fell in love with it either. It was a much nicer thing to look at than to ride.  Girder forks take a bit of getting used to at first. Watching the unsprung headlight bobbing up and down infront of you is a little disconcerting until you become acustomed to it, as does the total lack of dive under braking. |
| |
My worst worry about dying is my wife selling my stuff for what I told her it cost...
|
|
|
|
goldnrust
West Midlands
Minimalist
Posts: 1,872
|
|
Feb 12, 2024 23:11:26 GMT
|
Do I have any lathe detail homersimpson?! It's all lathe bits from here on out basically. hahaha. That M33 certainly looks good glenanderson. Shame you never really bonded with it, but that's just sometimes the way with vehicles isn't it, on paper you can have every reason to like it but you don't gel with it. Likewise it works the other way and sometimes there no good reason to like a vehicle but somehow it's just great  I think seeing the headlight moving about will be very weird to start with! Ok, so the engine is in bits, and I've now got a lathe and done some basic YouTube learning and I'm ready to have a go at making bits. I thought I'd start with a relatively easy fix as my first turning project. The crank case breather, which I previously mentioned, is also the primary chain cover mounting stud, and somewhere along the line I presume my bike has been dropped on that side and the mounting lug on the crank case was broken. This was confounded where a previous owner had rammed a corse threaded bolt in there and destroyed what was left of the threads. 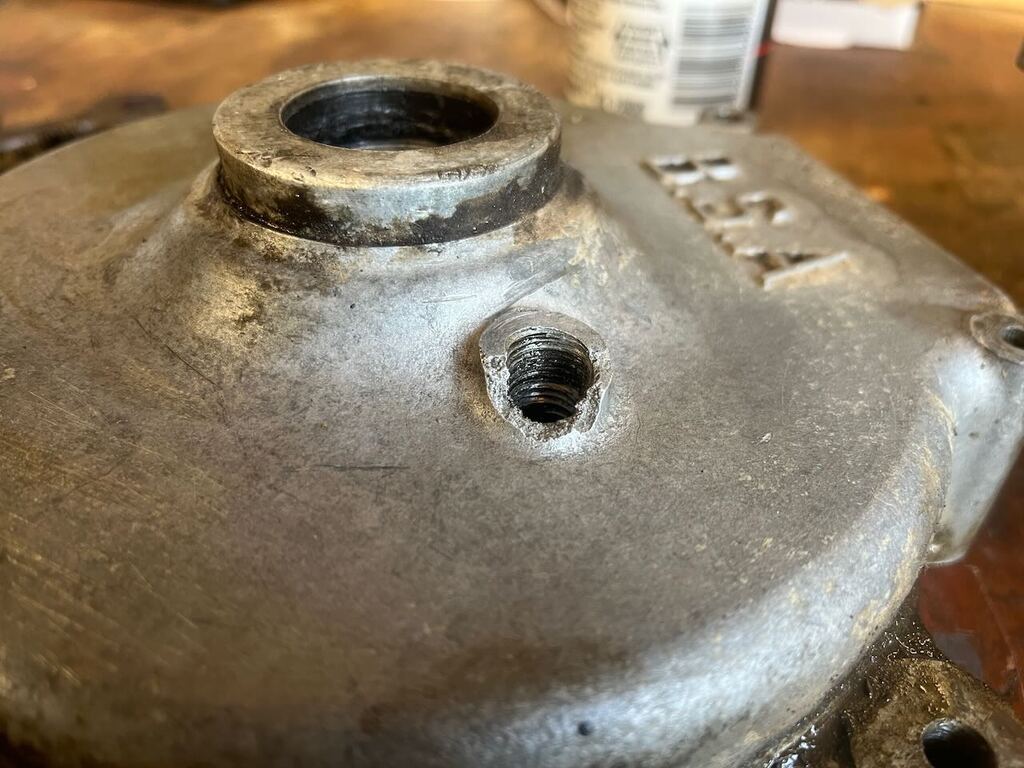 I drilled out the remains of the mounting lug, and then turned up a little aluminium plug to fit in the hole.  As this was some of my first work on the lathe, it took a couple of attempts and isn't perfect, but it's good enough to do the job. I was pleased with the accuracy though, as I was able to achieve the press fit I was aiming for, and also learnt a lot. I feel like thinking about the order of operations to be able to make the part I wanted was a big part of the learning curve, as was getting parts to accurate dimensions.  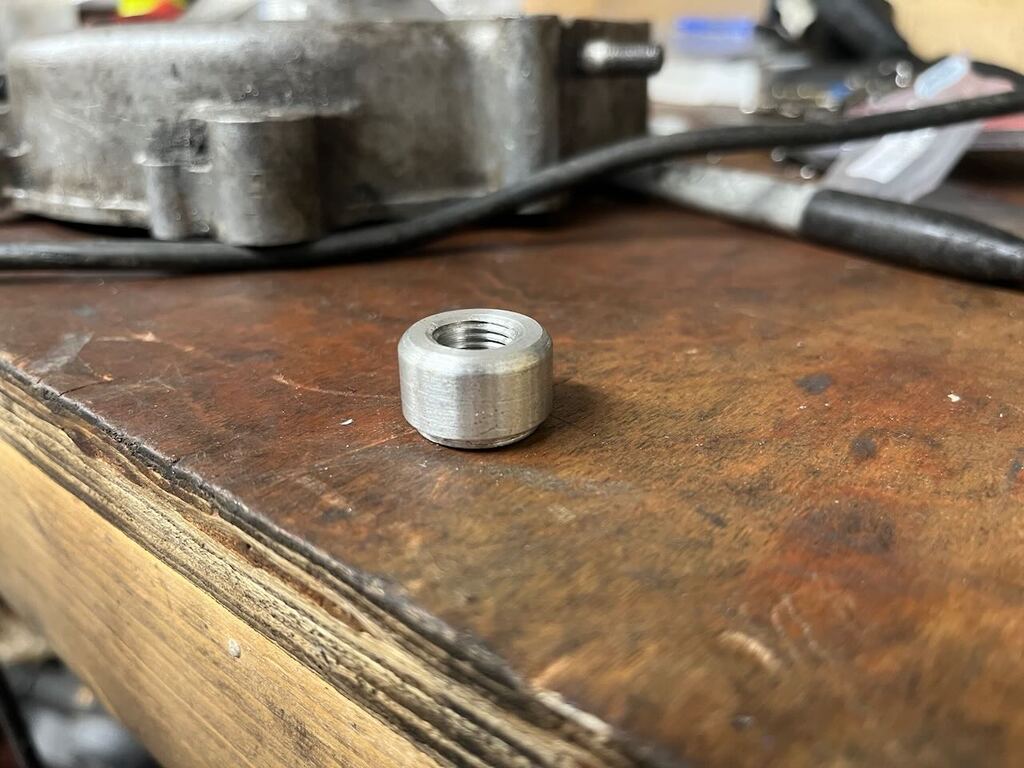 Before I parted the lug off from the lathe I specifically cut a groove on what would be the back side, to give me a recess to fill with weld. Pressed into the crank case it was going to do the job nicely. I then welded it from behind, and ground that back flush so it would clear the crank. 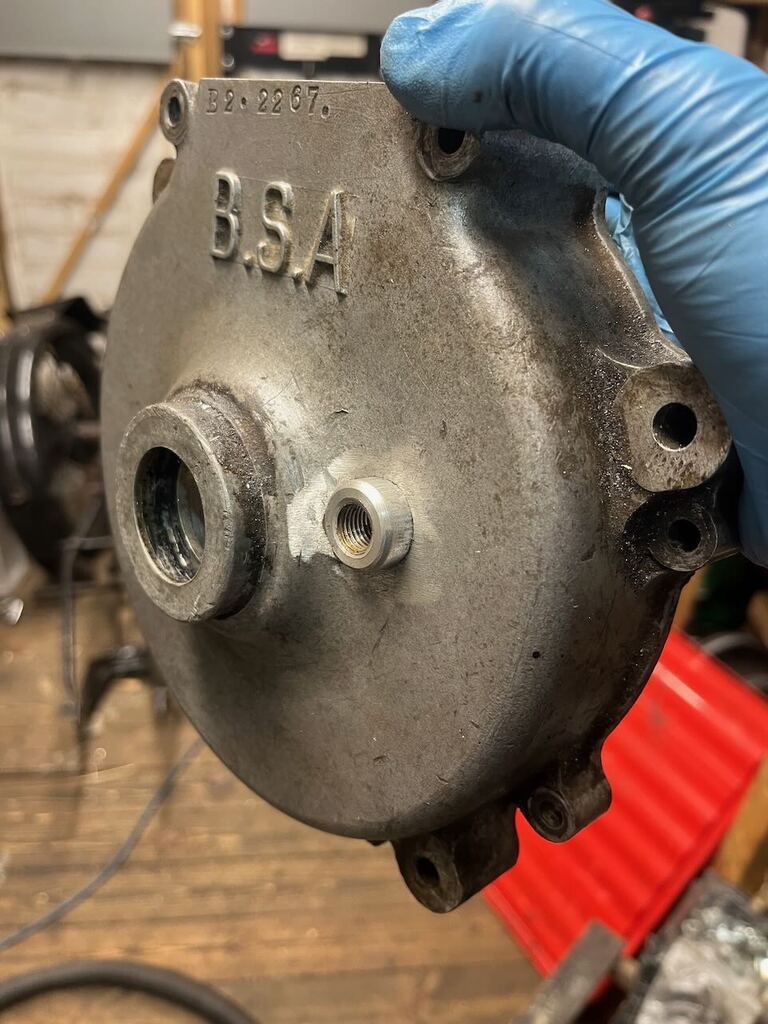 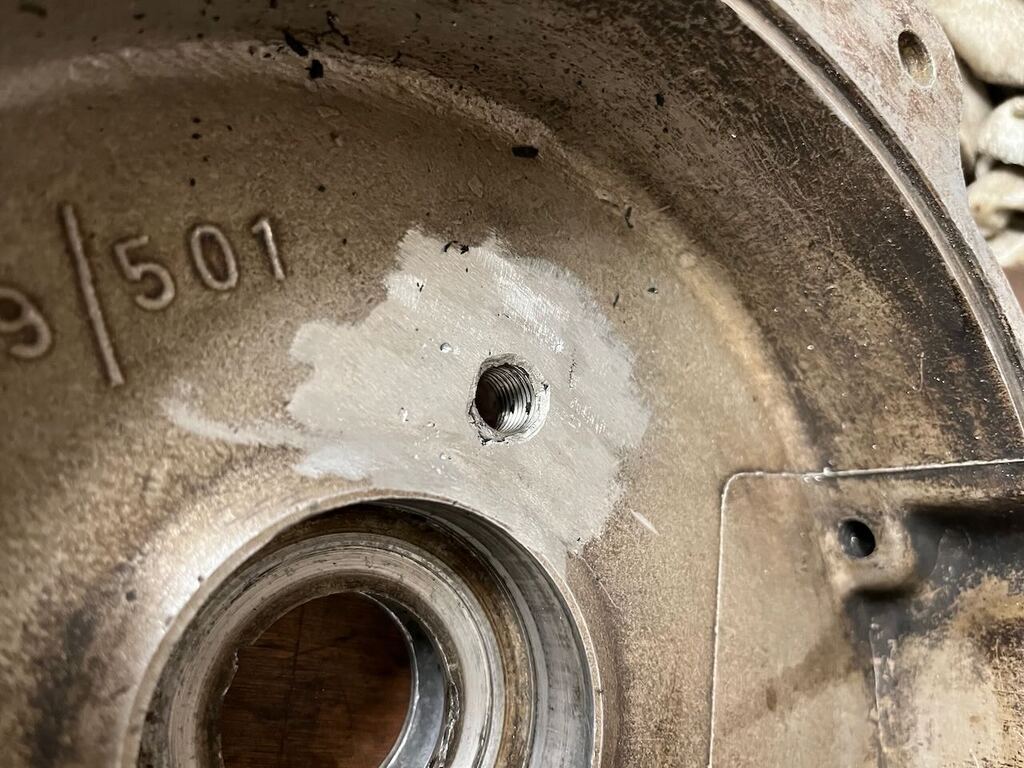 One fix down, a bit clunky looking, but its hidden under the chain cover and would be plenty strong Also to fix on the crank case, one of the 4 studs that hold the barrel on must have stripped out at some point. A previous owner had fitted a larger corse thread bolt in place or the original stud and had also drilled out the barrel to allow this bolt to pass through. Given the crank case had already been drilled out for the larger bolt, which had be in turn stripped and liquid metal poured in there too, I didn't think I could helicoil it effectively. Lathe to the rescue, I was able to turn myself up a custom stud, bigger on the side that goes into the crank case and original diameter on the half which fits in to the barrel. I also turned down the nut to be the same low profile shape as the original nuts on the other 3 barrel mounting studs. To complete the job I turned a small brass sleeve up that I could press into the barrel to bring the mounting hole down to the original size, which would help make sure the barrel locates in the right spot. 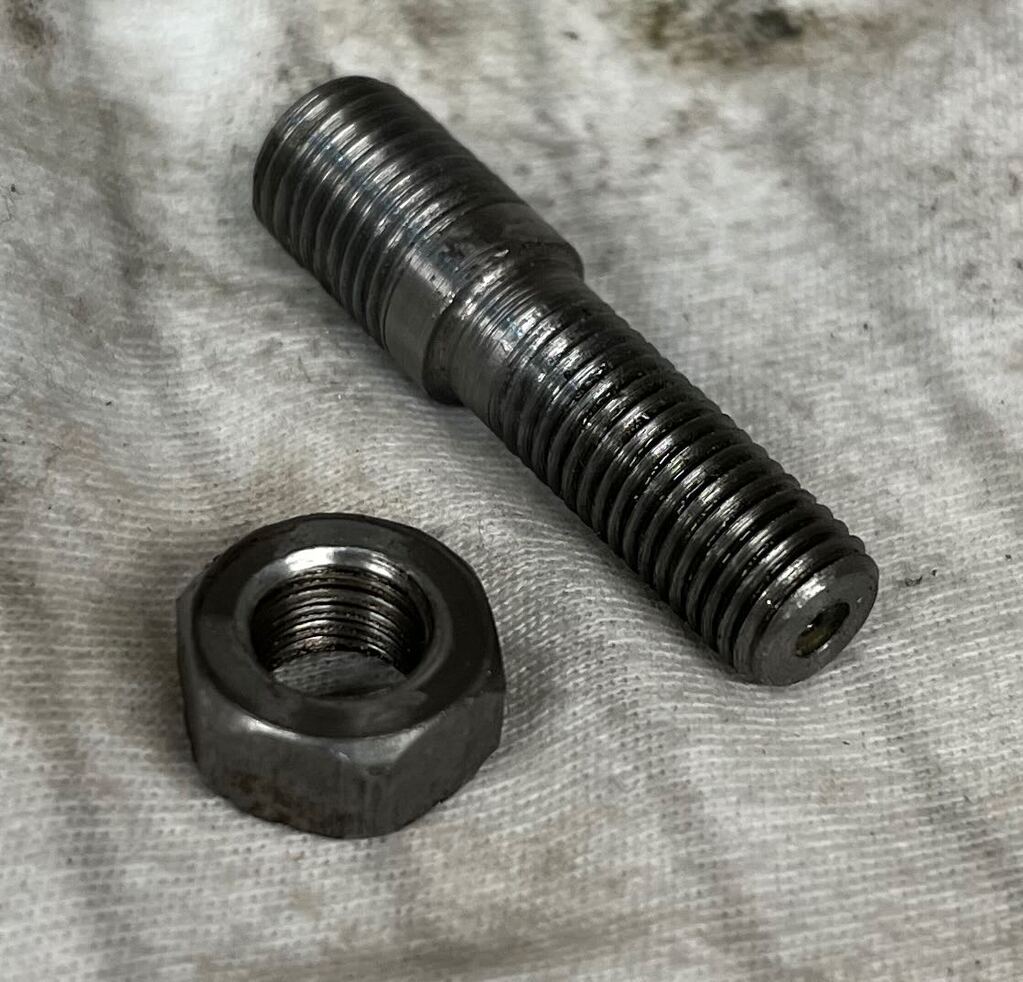 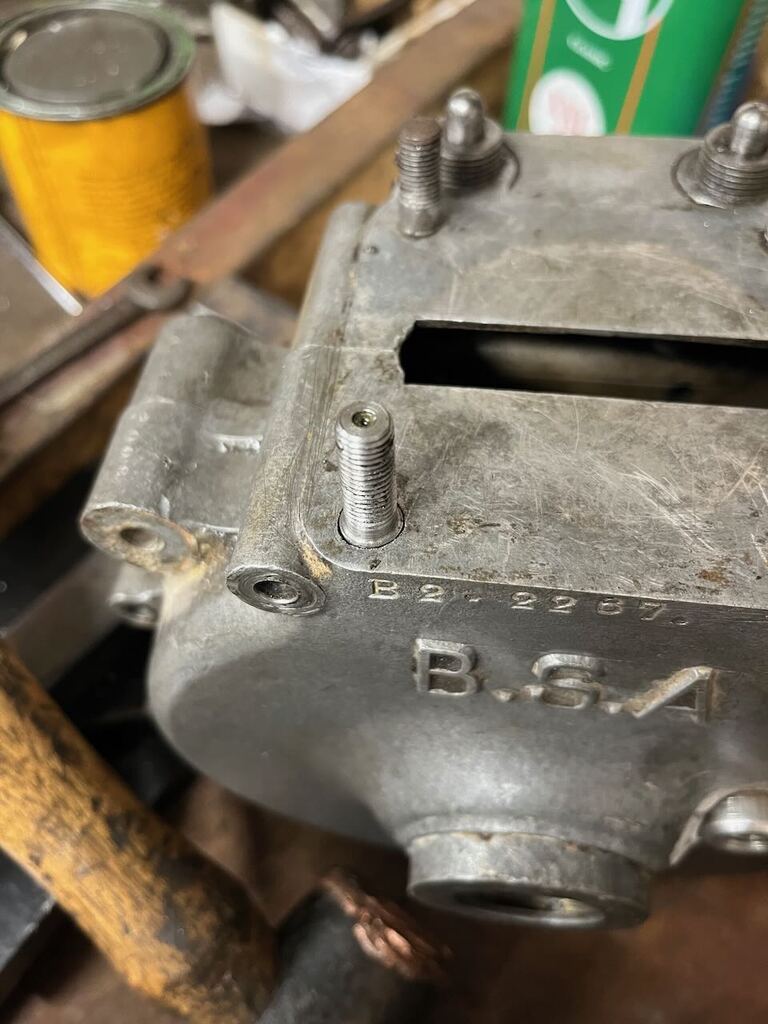 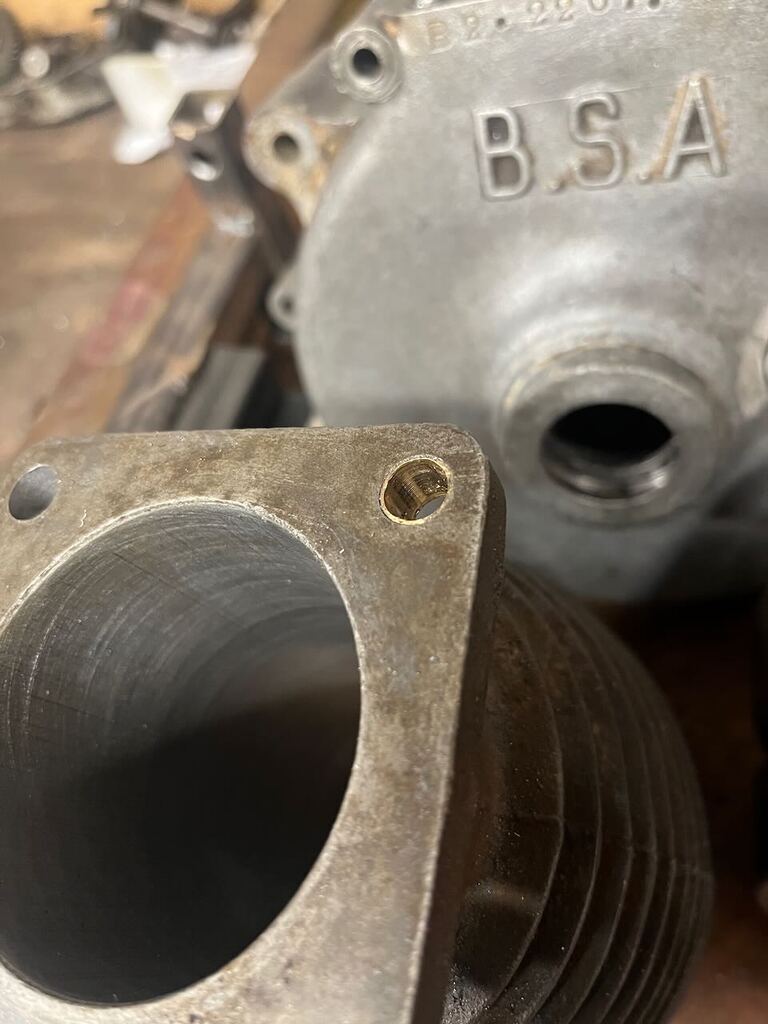 Another successful fix. The lathe was paying for itself already! To finish off the crank case, I was able to pick up a replacement drive side ball bearing, it happens to be the same BSA part number as the later M20 model uses and so was easy to find. The non-drive side of the crank simply runs on a bronze bushing in the case, I couldn't see significant wear here so left it alone. I also bought a sheet of felt and cut out a new felt sealing washer for the drive side bearing (no rubber seals anywhere on this bike, its all felt), and with that the crank cases were sorted. The crank and con rod was next on my list. The major issue I'd stripped the engine down for was the vertical play at the piston, and with the crank on the bench I could feel a bit of small amount of movement in the big end but most of the movement was in the little end. I split the crank so I could inspect further. Starting with the big end, this runs on loose roller bearings. After some careful measuring I found the the con rod was showing around 0.001" of wear, the crank pin appears to match the original size but the rollers themselves were worn by 0.002", which would be magnified to 0.004" of movement when you consider they encircle the the crank pin. The bike was also fitted with 2 rows of 1/4" by 1/4" rollers, whereas standard should be 1 row of 1/2" x 1/4". The con rod itself was a bit marked on the bearing surface, but nothing I could feel with my finger nail. The crank pin looked pretty good to my untrained eyes. 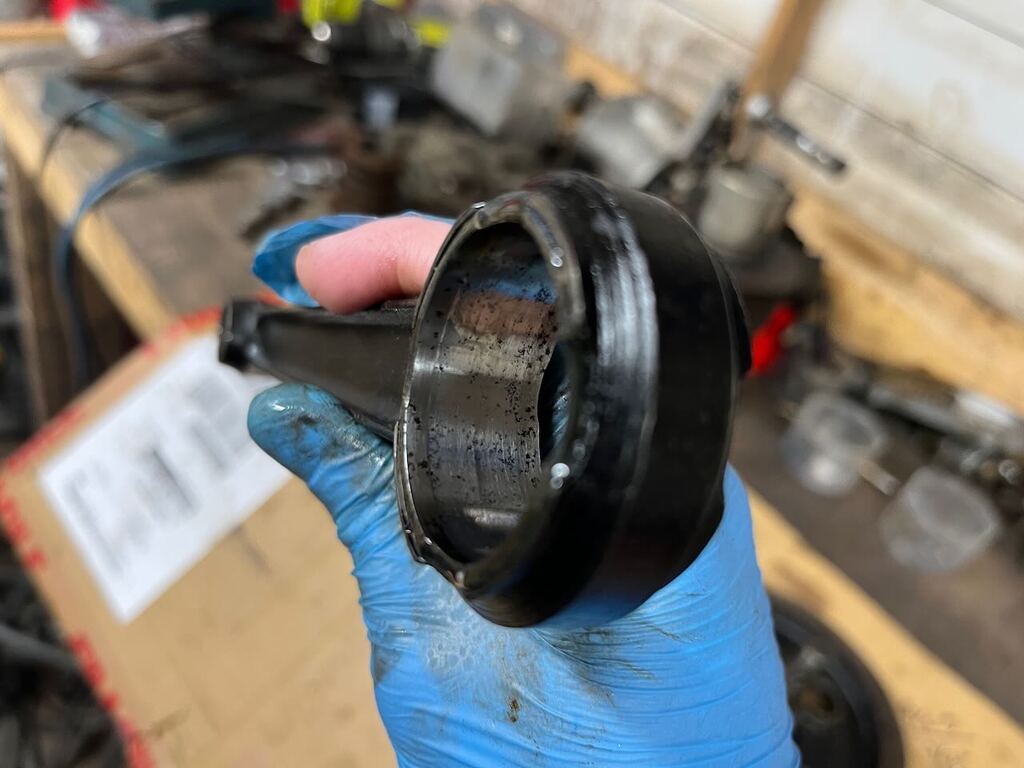 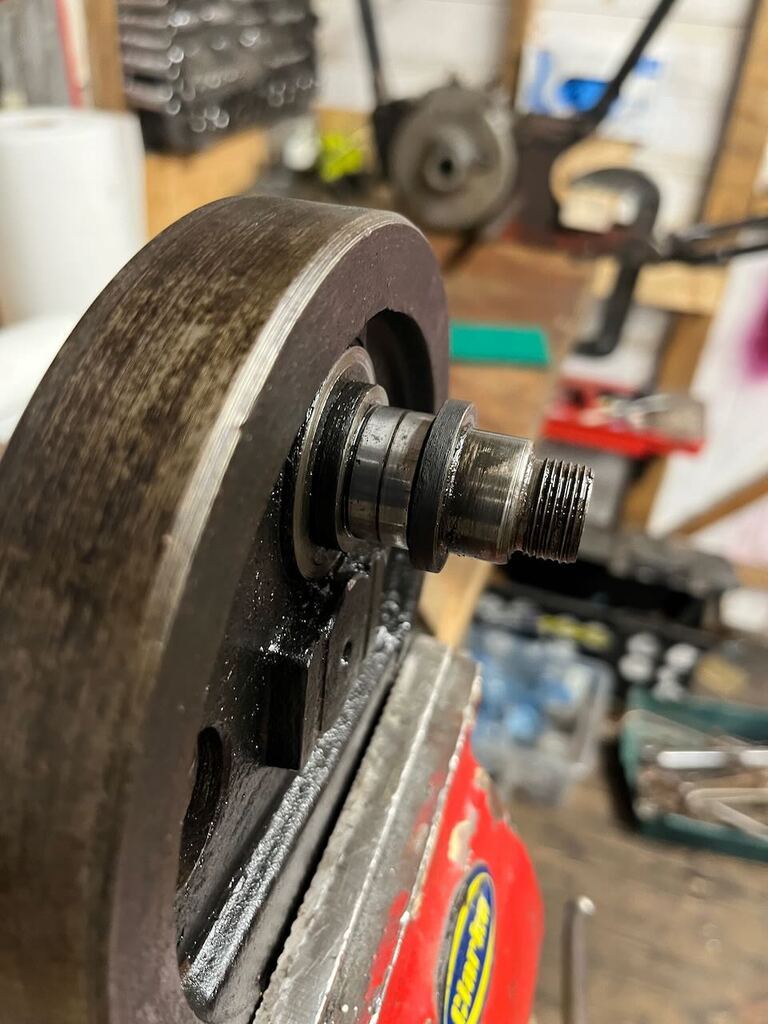 Finding another con rod would be like finding a needle in a hay stack. The main way to take up slop in the big end on worn old rods like this seems to be to either use a custom oversize crank pin, or have rollers ground oversize. Given most of my wear appeared to be in the rollers themselves, I thought I'd take a chance of a set of new standard size rollers, they are cheap enough online. I'd do a dry assembly and see how it felt. The good news is that it instantly felt better than before, so I was happy to call that a success. One other issue I'd spotted with the big end was that the thrust washers had a reasonable wear lip on them. You can see this in the crank pin picture. There's no hope of getting a pair of thrust washers the right size off the shelf. I had the idea to fit the original thrust washers on backwards, meaning they would be showing a fresh unworn face to the con rod. They are pressed on, but there's an access hole so you can drive them off from behind. Once removed I ground a fresh chamfer on the backside of the washer, this chamfer helps catch oil droplets and feed it to the big end, then was able to tap them back into place, after double checking the orientation of where the chamfer should line up. 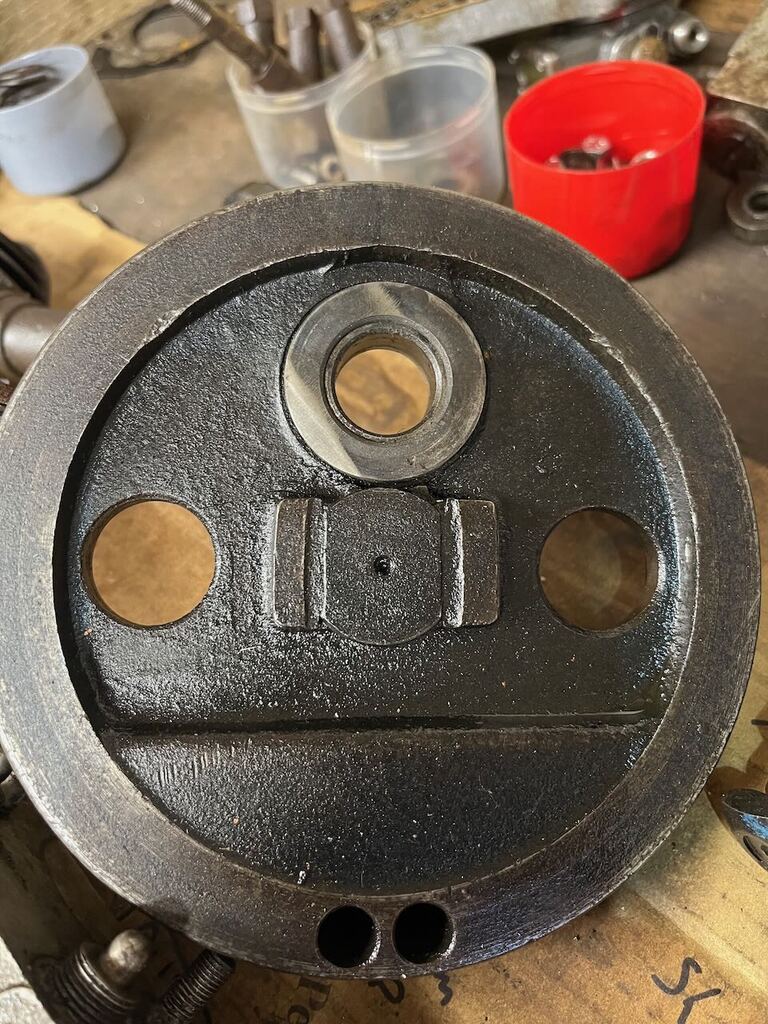 This just left the small end problem to sort, which really was the biggest problem. The surface inside the small end of the rod didn't look great and I could measure ~0.006" of vertical wear / ovality. As mentioned, finding another con rod was going to be seriously difficult, and little end wear is a known problem with these engines so the likelihood of finding one any better than mine was slim. The gudgeon pin runs direct in the steel rod, with no bushing or bearing, and there's very little spare material to allow room for a bushing to be fitted. The 0.006" of wear actually bought the standard diameter of 0.625" out to very close to 16mm. I had the ideas to try and source a suitable 16mm gudgeon pin, and ream both the rod and the piston out to suit. If it didn't work then all I'd done is taken the small end out to round again, which would be needed if I was going to try and use a thin bush and undersized pin anyway. Pistons that can be made to work are still available, so I was less concerned about having to modify that. I found a suitable gudgeon pin, from a Lambretta as it happens, and bought a suitable reamer. It took some careful work but I got there. I will say I used an adjustable reamer for this and it was rubbish. It could be user error, but I've got various fixed reamers and have had no trouble with them. In this case I wanted the flexibility of the adjustable one to creep up on the size slowly, but I probably should have been brave and just picked up a fixed 16mm reamer! 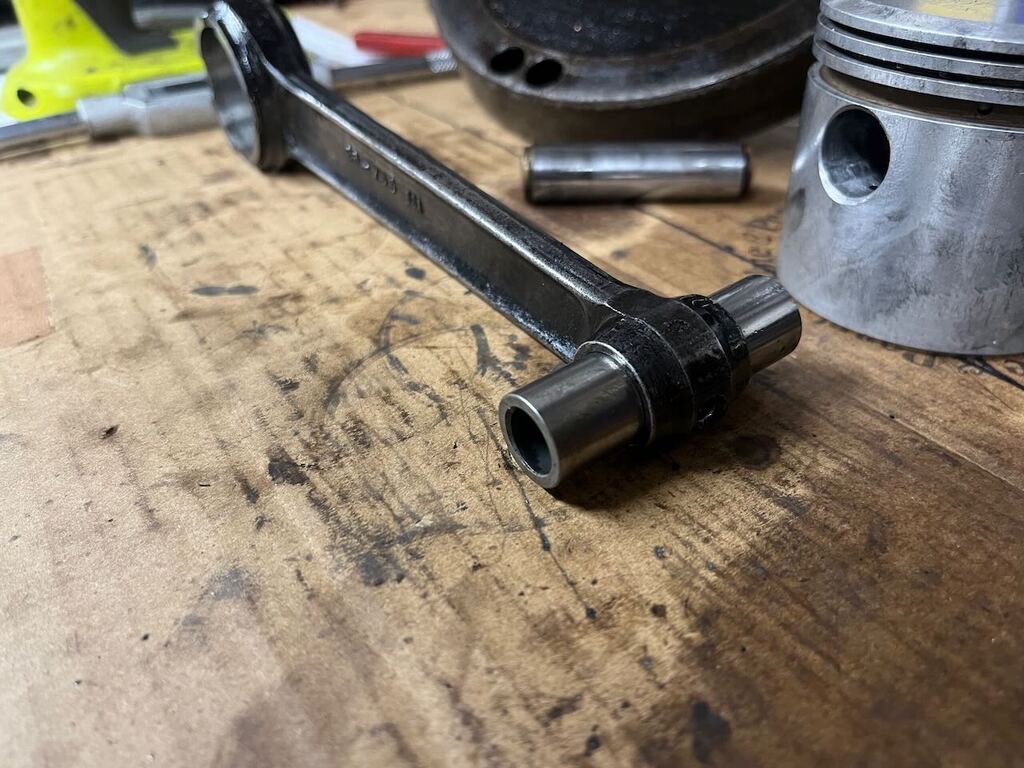 The pin still has a little more 'shake' than I'd prefer, I think the outer extremities of the rod were more worn than my 0.006" measurement, but it's still much much better than it was so worth a shot. Reaming out the much softer aluminium piston was less eventful. This lead me back to my next lathe challenge. The gudgeon pin is not retained by clips, as I have experienced in all the other engines I've had apart, but in this case has bronze 'cushions' that press into the pin and simply brush against the cylinder wall if the pin tries to slide sideways. I made up a new pair on the lathe, adding a little extra thickness than the original design to account for my gudgeon pin being ~0.040" narrower than stock and the 0.060" oversize bore. They the were pressed into the Lambretta pin. 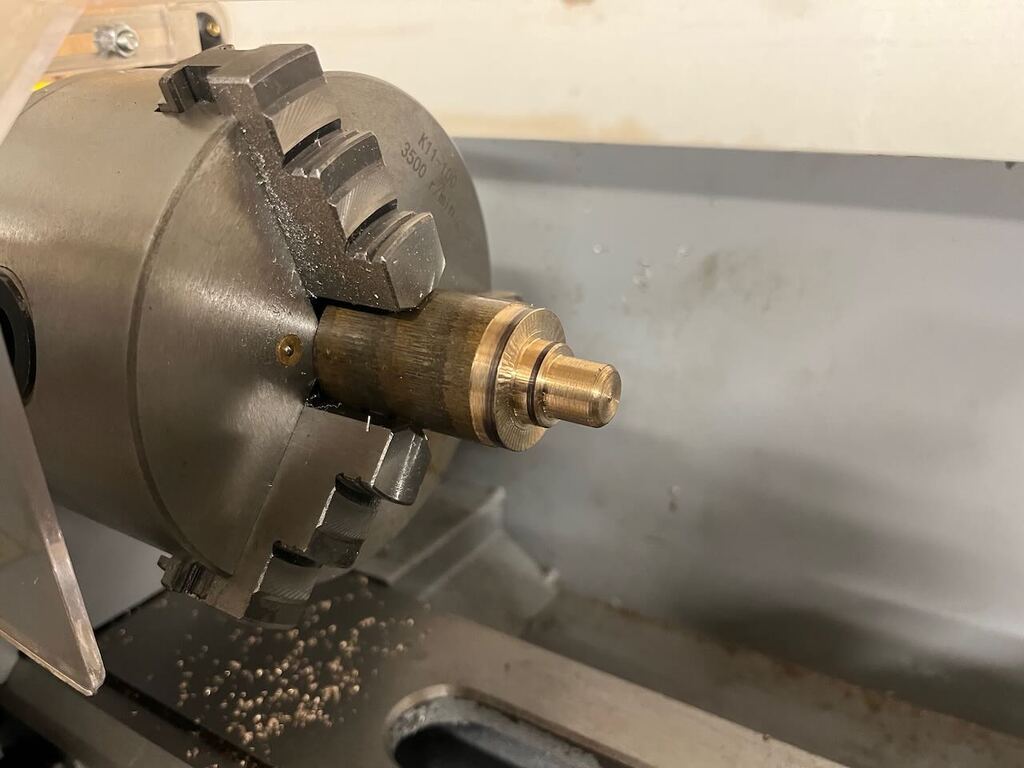 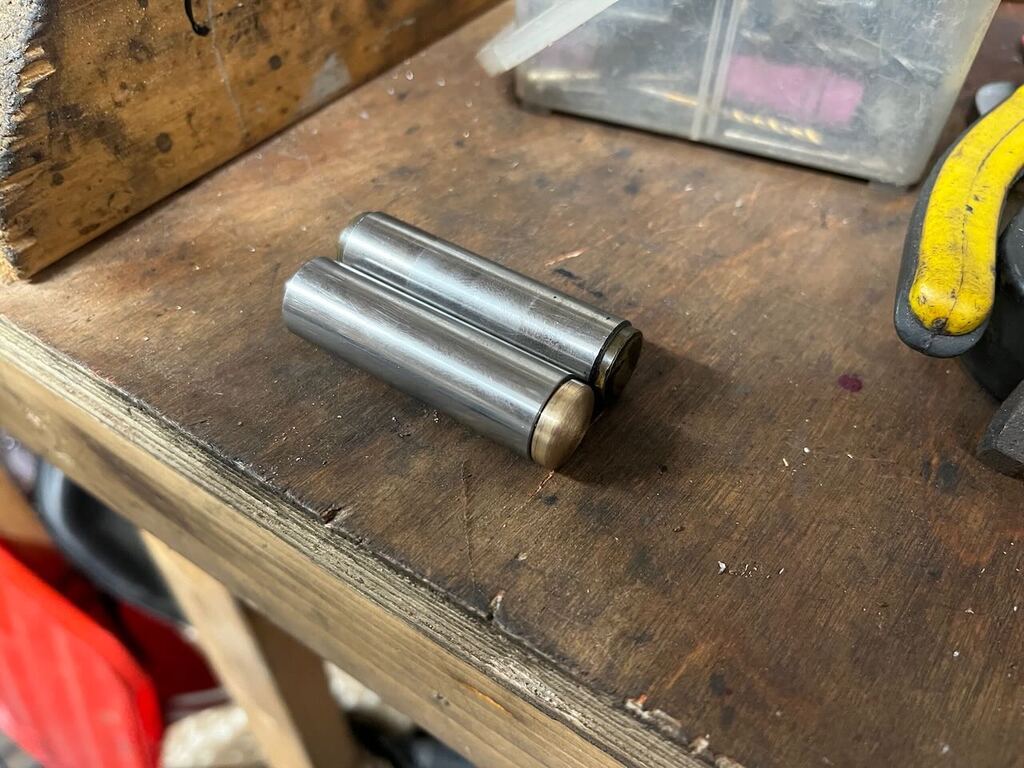 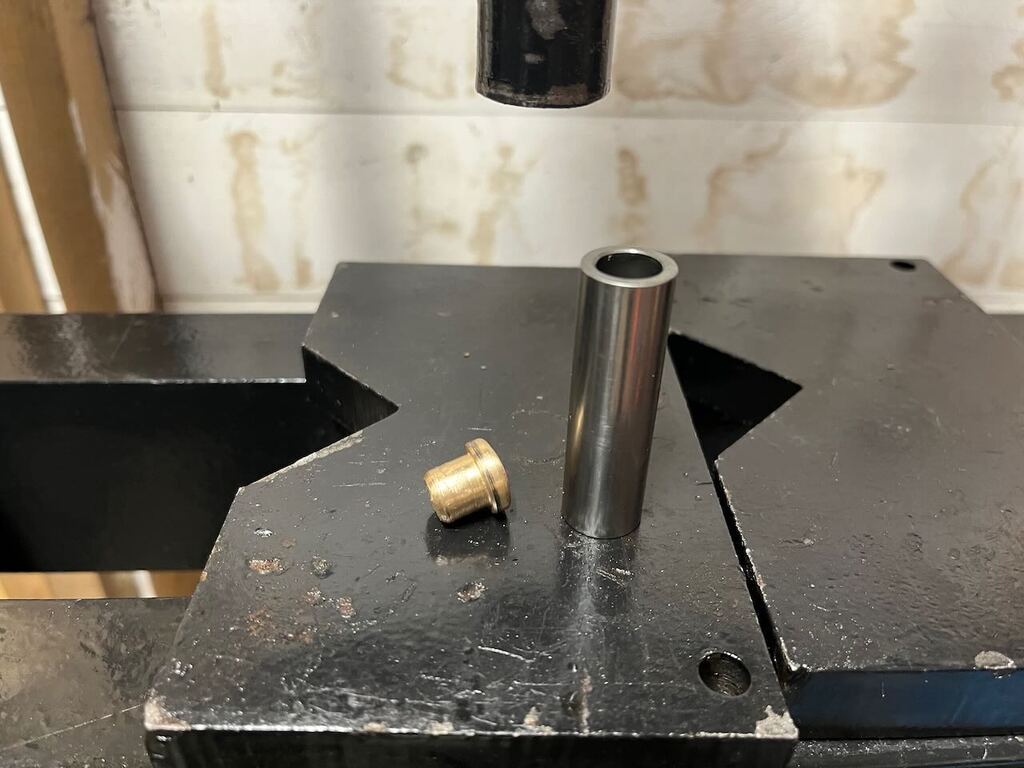 I'm a bit lacking in pictures here but I can confirm it all fitted together much better now and I was happy that there was no vertical play at the piston. So with that done I could bolt the crank back together and enjoy the fun task of truing it. Which basically entails lots of measuring and occasional whacks with a big hammer till the dial gauge shows a minimum of run out. 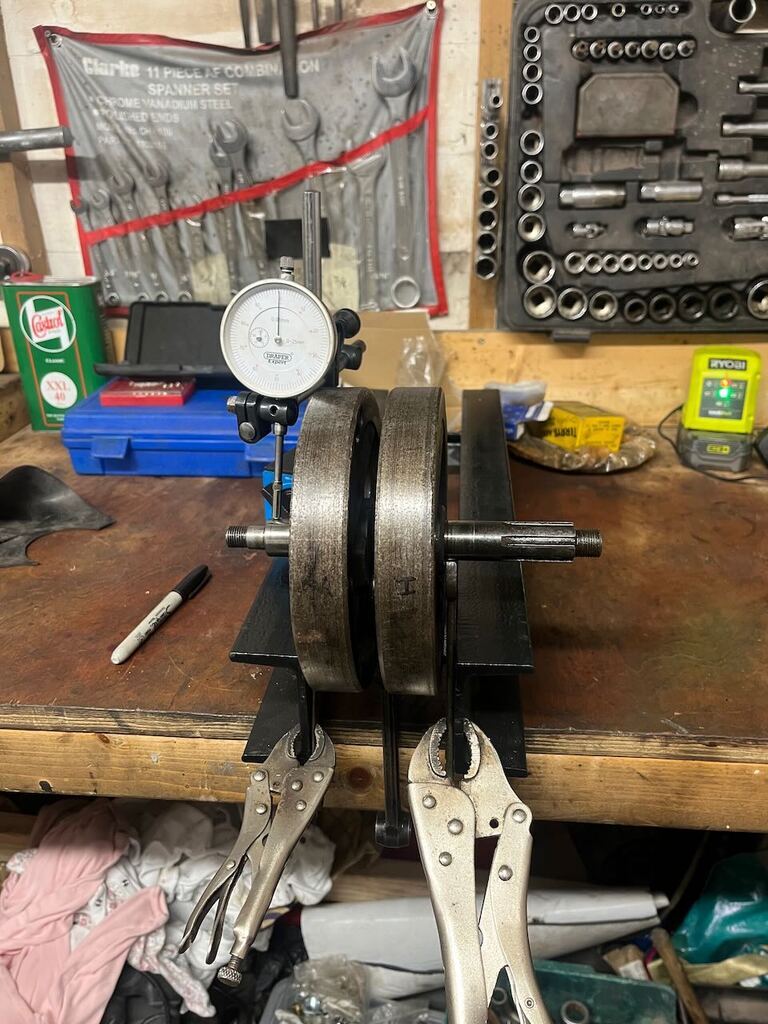 I will say truing this single cylinder crank was way way easier than my two cylinder Suzuki crank! After a couple of hours I got it to within 0.0015" of true and called that good enough, especially considering some of the other tolerances, and wear, in an engine of this age! The final task before assembling the bottom end was to deal with the exhaust cam bush which I had discovered was loose in the case. After more careful measuring, and consulting the various scans of photocopies of photocopies of parts books, magazine articles and user manuals from which I'm drawing lots of my information, I concluded that the case wasn't worn excessively, and that this was not the correct cam bush. After some careful measuring I was able to turn up a replacement that was a nice press fit into the case. I did have to go back to the lathe after this first picture, as I had left the larger diameter lip a bit deep and the exhaust cam ended up 0.010" proud and bound up when the outer cover was fitted. 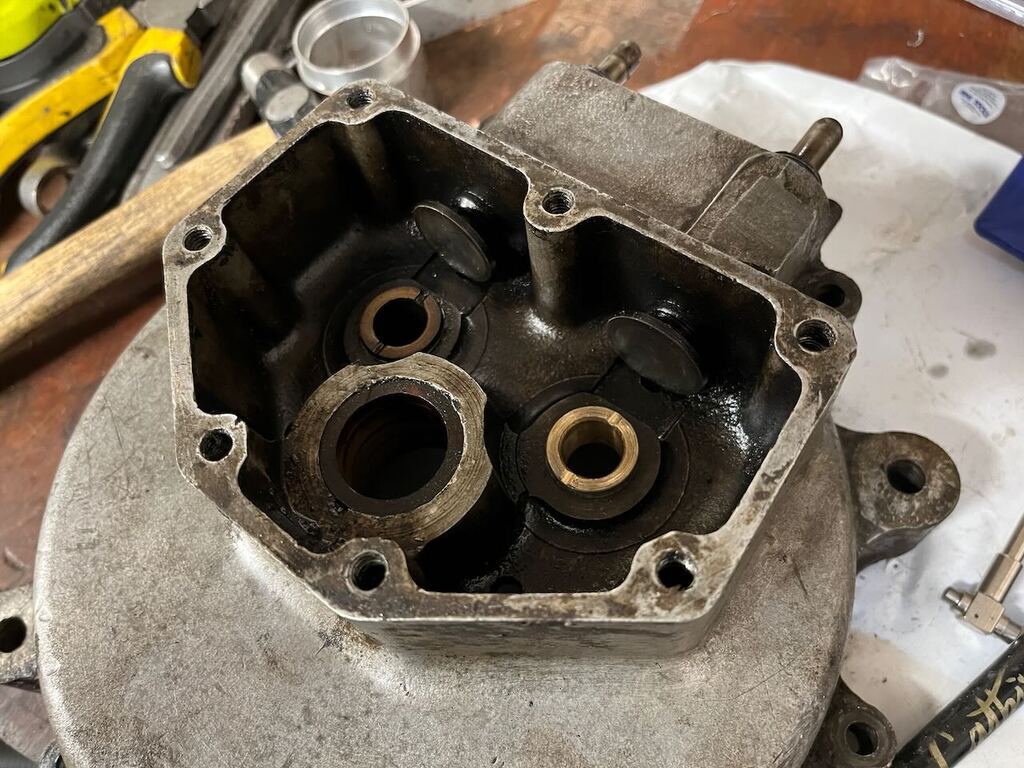  With that, the bottom end could now be reassembled and the cams fitted and timed. 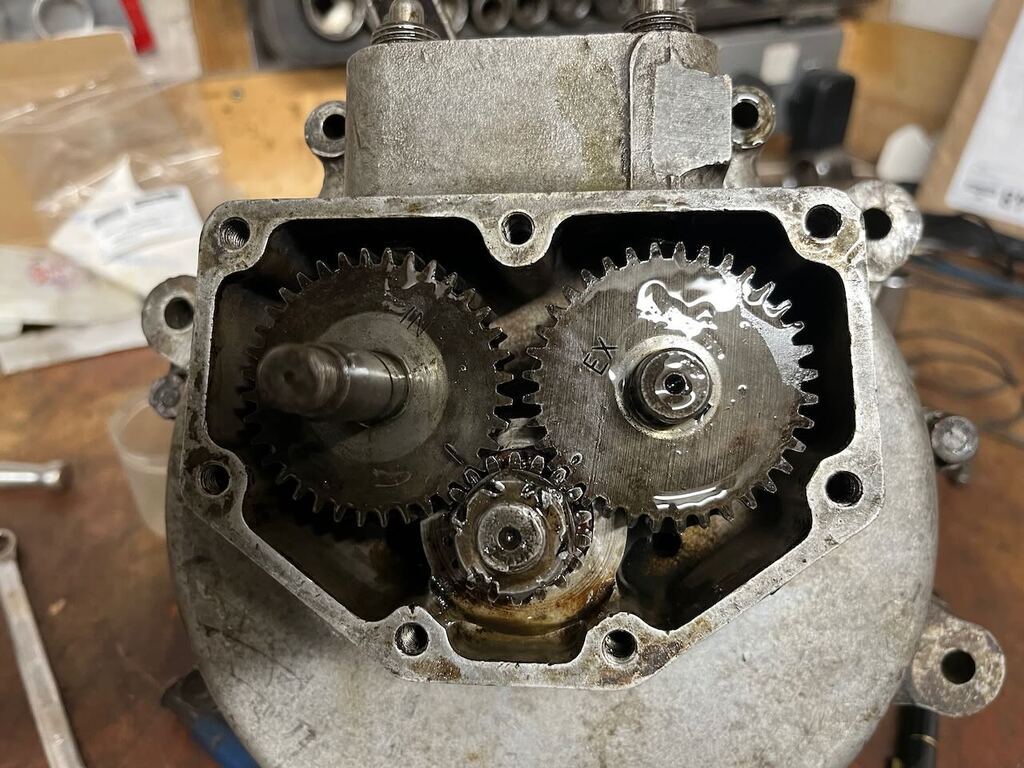 Top end next time. 🙂 |
| |
Last Edit: Feb 13, 2024 10:48:04 GMT by goldnrust
|
|
|
|
|
Feb 12, 2024 23:23:04 GMT
|
|
Very impressive work with the lathe, where do you get your bits of material from to work with?
I've used a metal place in Redditch in the past (Rapid Metals) who sell off cuts but I haven't found them overly helpful (or cheap!).
|
| |
|
|
goldnrust
West Midlands
Minimalist
Posts: 1,872
|
|
Feb 13, 2024 11:00:01 GMT
|
|
I mostly just buy bits of eBay. I'm sure it's not the cheapest, but it's convenient that it just gets posted, and I can pick from a wide range of sizes. The bronze is especially pricey, but for making bearings and bushings for an old engine like this, it's the right thing to use.
All 3 of the bronze parts in that update came from once piece that cost me about £25, and I had some left over for the next project. Whilst on one level £25 is a lot for a fairly small chunk of metal, making an unobtainable cam bushing for ~£8 and some of my time, is great!
|
| |
|
|
glenanderson
Club Retro Rides Member
Posts: 4,121
Club RR Member Number: 64
|
|
Feb 13, 2024 12:16:17 GMT
|
|
The best thing about something like this is its simplicity and low state of tune. It means that pretty much anyone with a grasp of practical mechanics can keep it running indefinitely; providing they are able to live with its shortcomings. Even something as relatively closely related as my M33 was is just that couple of steps up the evolutionary ladder to make things much harder to keep up with when there’s little or no spares support.
|
| |
My worst worry about dying is my wife selling my stuff for what I told her it cost...
|
|
|
|
|
Feb 13, 2024 20:49:23 GMT
|
|
What a fabulous thing, so much style... 😻
|
| |
Bicycle x1
Alfa Giulietta (now wife's)
Alfa 156
BMW 630i
Honda rc36
|
|
goldnrust
West Midlands
Minimalist
Posts: 1,872
|
|
Feb 13, 2024 22:13:23 GMT
|
Exactly, glenanderson. Technologies like the splash oiling certainly have their limitations, but they do make things simple. If the tolerances are large probably all that will happen is it will rattle a bit! It had probably had that wear in the big and little end for decades. You try running an engine with 'normal' plain metal shell bearings and a pressurised oil system with 0.005" of movement in the big end and see how long it lasts... haha. My back yard engineering skills are a better match for an engine of this era than something newer. Right. Top end time. 🙂 I mentioned in the initial inspection that I thought the bore looked ok. The good news is that it is gonna be fine. It measured up up with little sign of wear. A light home hone just broke the glaze on it, and no sleep will be lost over the minor vertical scratches. 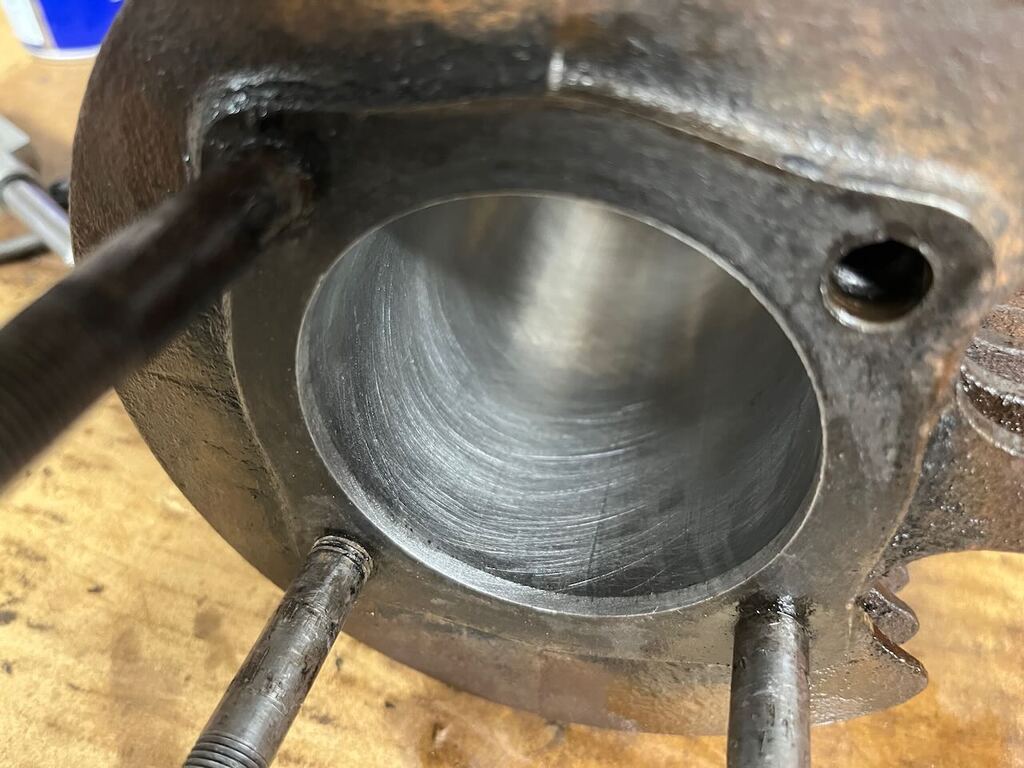 The piston itself also looked fine, sorry no pictures, but the ring gaps were all over the place. Whilst I couldn't find a spec for this bike, the piston I'm using is actually for a slightly later bike, a BSA C10, which is kind of like the first post war version of this bike. The C10 spec is 0.010" gap. My top ring was tight at 0.007", but the second ring and oil scraper were both about 0.050". I suspect they were simply the wrong rings! I couldn't find a +60 ring set for this exact piston, but I could find a set for a different model of piston that also is at times recommended for this bike and the C10. So I chanced it. The two compression rings were fine and spot on in spec out of the packet. The oil scraper ring was not going to work though, it was noticeably thinner than the groove cut into the piston. I had been in two minds about omitting the oil control ring anyway, so this made up my mind for me! The original 1934 piston did not have an oil control ring, and knowing that exhaust valve is only lubricated by oil that has made it up past the rings into the combustion chamber, I wasn't sure that limiting that oil was a good move? Also the user manual discusses tuning the oil pump based upon the smoke from the exhaust, so if the oil control ring cut that down it might not help me. Alternatively the oil control ring might have just made things better, save me from fouling plugs and generally running with a smoke screen behind me! I guess we'll find out... Barrel and piston could now go on the rebuilt bottom end. I cut a new base gasket from a sheet of gasket paper and made a head gasket from some 1.5mm copper sheet. 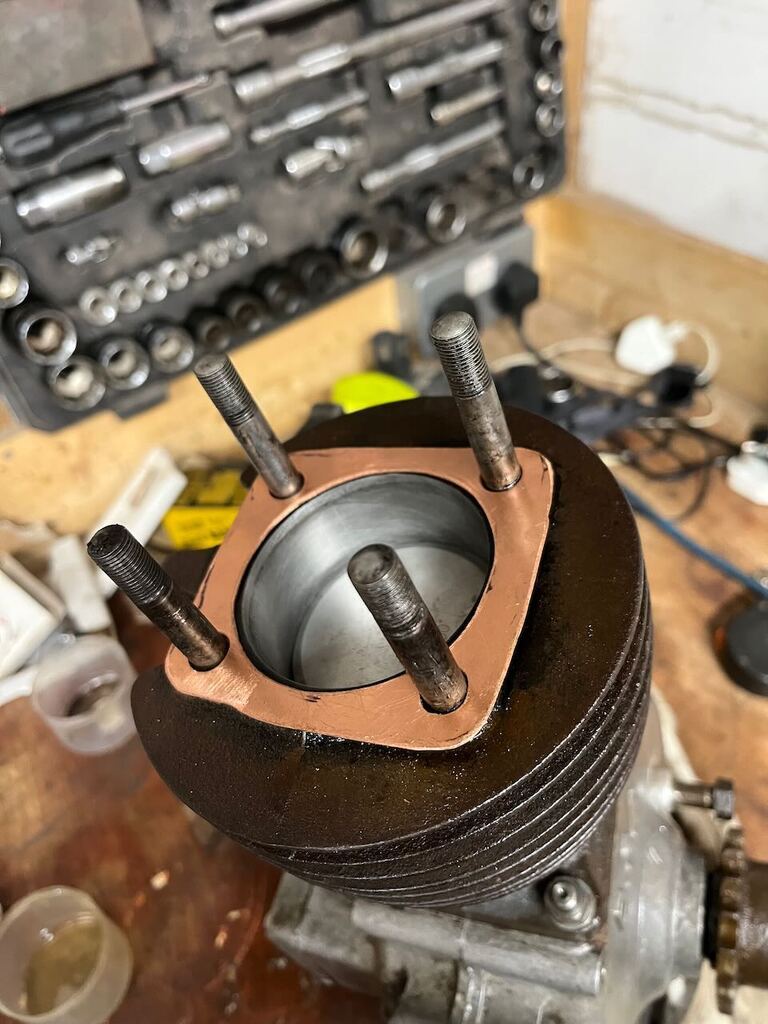 Time for the head next. As previously mentioned, the valves were loose in their guides. With no pressurised oil system, aside from the fact it might rattle, I doubt that's the end of the world for the exhaust, but I didn't want the engine running lean by sucking air down the inlet valve. So back on the lathe and was able to make some new guides. 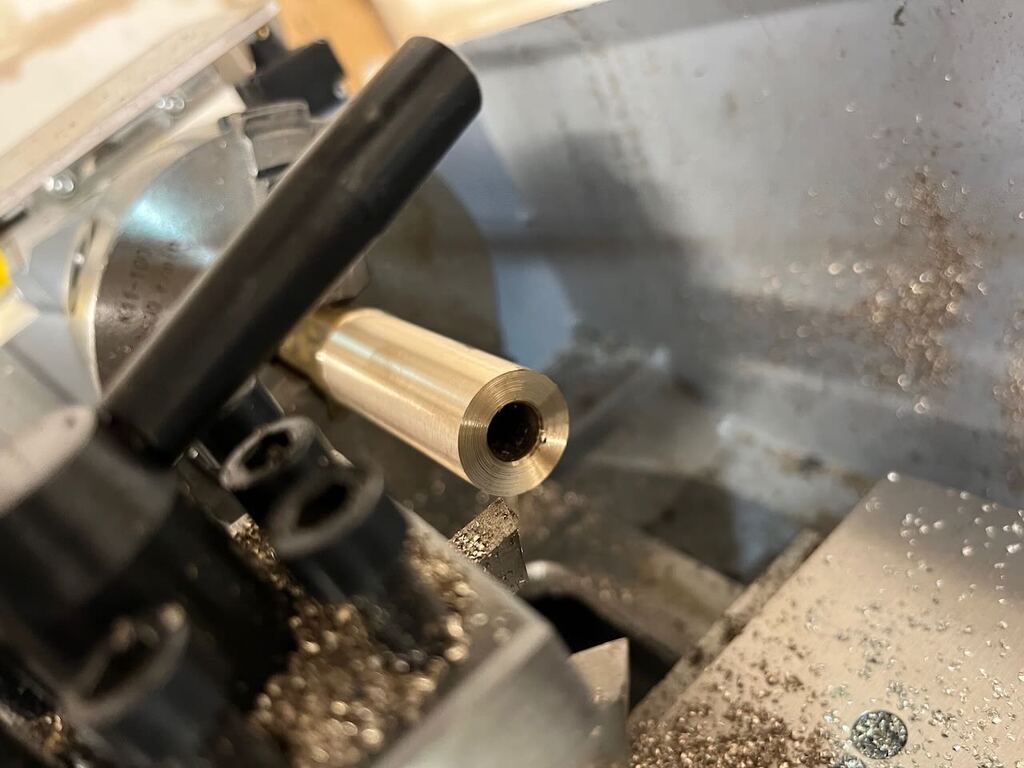 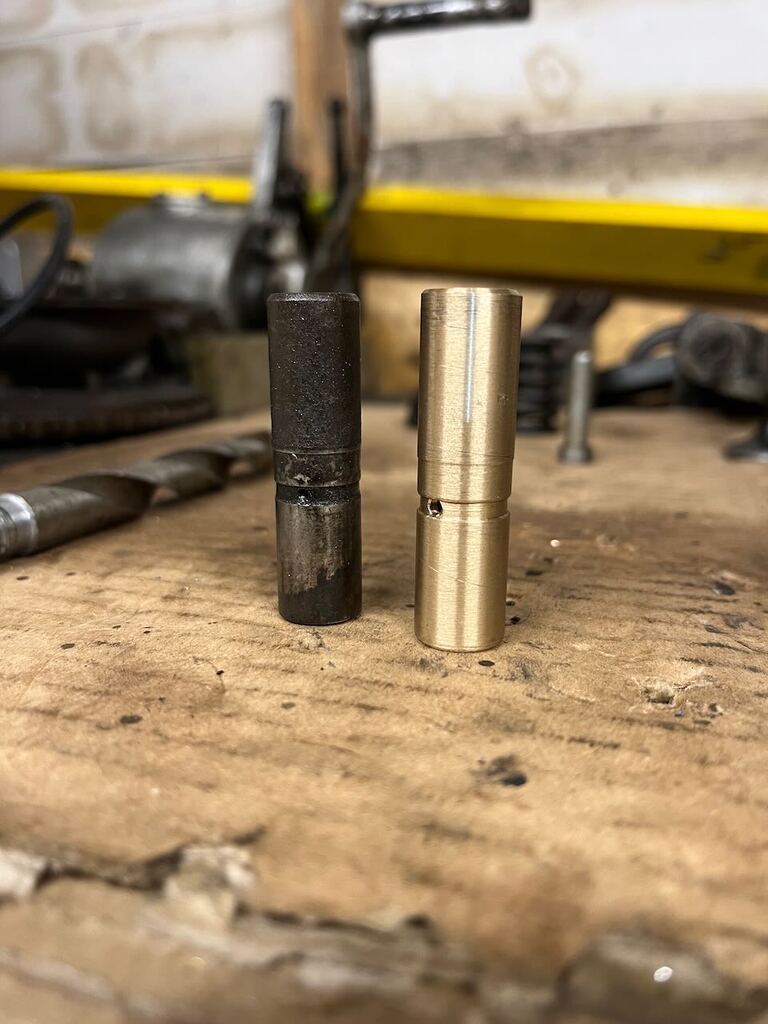 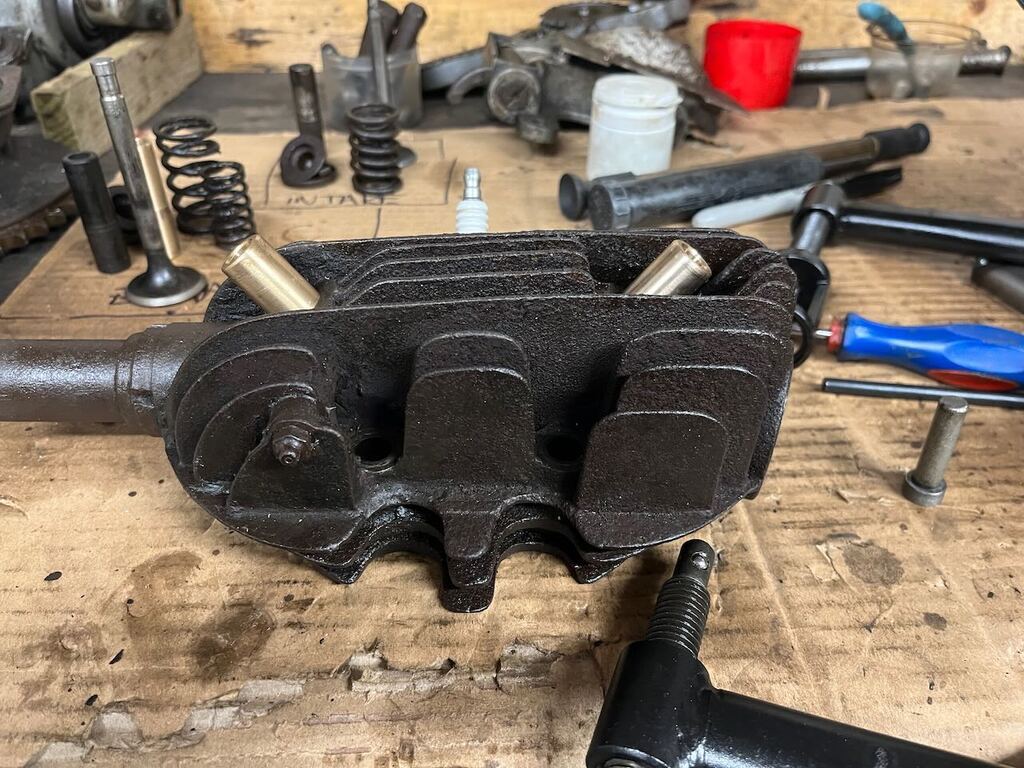 The valves lapped in to the heads with minimal work and we had a good seal. The valve springs that came on the bike were clearly past their best. The exhaust spring was especially soft and someone had put washers between the head and the spring to try and add a bit more pressure. They are a twin spring design, and after lots of cross referencing of part numbers I was lucky enough to find a set of NOS outer valve springs, labeled up for being for a different side valve model. The original inner valve springs will have to do for now, but the replacement outers alone made a big difference. With that the head could go back on and the final piece of the puzzle was the rocker assembly. Thank fully there was no real problems to be found here. There was a little stepped wear where the tips of the rockers contact the valve stem, but it was the work of a few minutes to use a diamond file to smooth that off. Other than that I just stripped them apart and cleaned the old grease off, the exhaust rocker must have got pretty hot as a couple of the grease passages were blocked with carbon. After that I could finish assembling the engine. I oiled the push rods, greased the rockers and in theory it's ready to go. 🙂 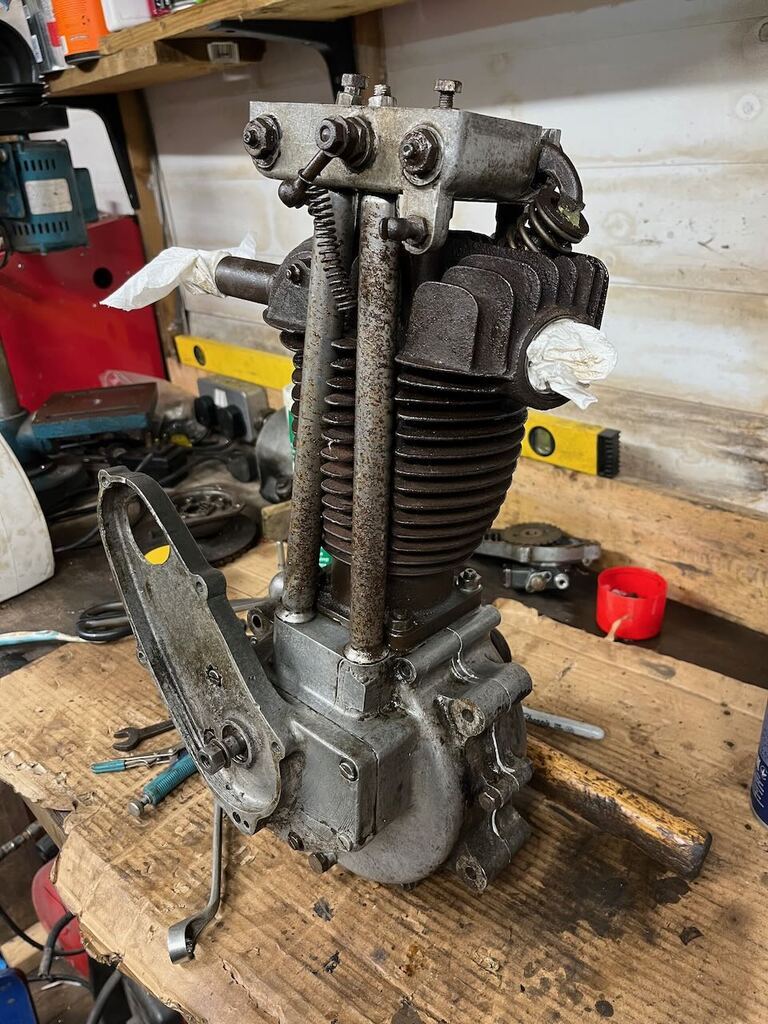 There is one elephant in the room, regarding the engine, and that is the magneto drive. It uses a small duplex chain, driven off a sprocket that fits on a taper to the end of the intake cam. Unfortunately both the engine and magneto side sprockets have been damaged and have teeth missing. 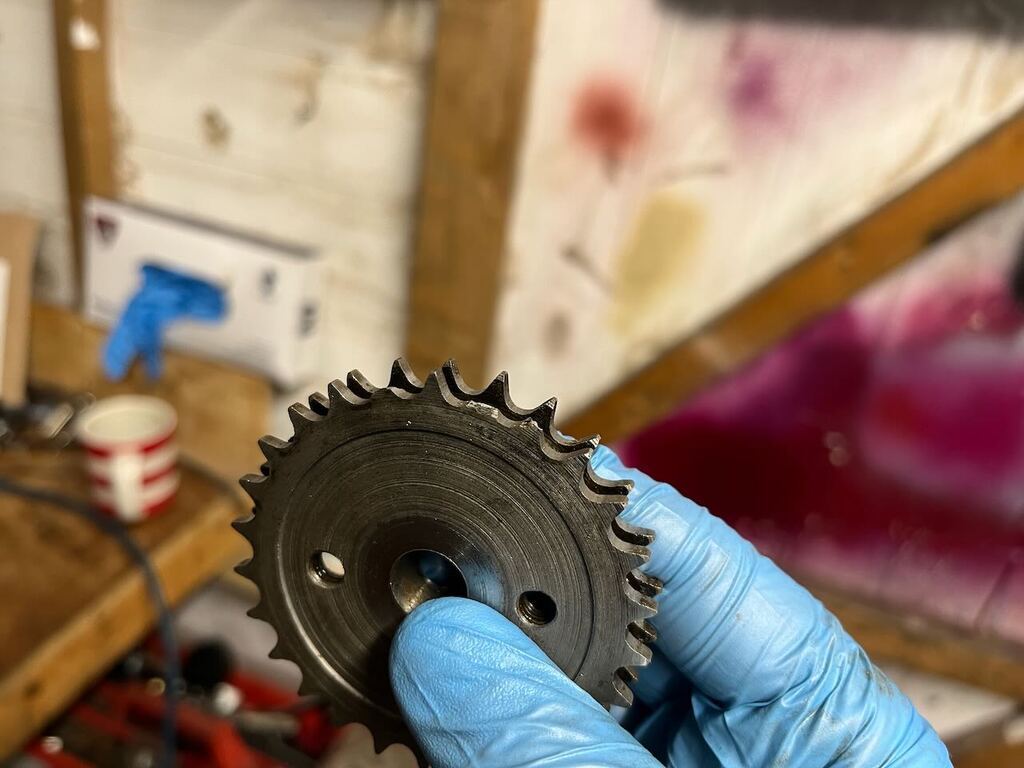 It's a duplex chain and the teeth are only missing on one side of the sprocket... clearly the bike was running like this? but can I go out riding with a clear conscience knowing those teeth are missing? I don't think I can. That is on the back burner though, for when I have some engineering inspiration as to how I might fix it! Its easily accessible with the bike assembled, so there's no rush to solve that issue immediately. Gearbox next time. |
| |
Last Edit: Feb 13, 2024 22:19:17 GMT by goldnrust
|
|
|
|
|
Feb 13, 2024 22:36:37 GMT
|
|
That seems a strange failure to only loose a few teeth on one side of the sprocket.
If the magneto a large load? If not then I would be tempted to leave it as it is as even with a tooth missing it should still work ok, any repairs might have a risk of a tooth coming off and causing more damage.
|
| |
|
|
goldnrust
West Midlands
Minimalist
Posts: 1,872
|
|
Feb 14, 2024 12:19:52 GMT
|
|
My best guess is a previous owner tried to use a 3 leg type puller to remove the sprocket from it's taper? And put all the load on a couple of teeth which then broke off? Alternatively it could be crash damage, there are repairs welded into the magneto chain cover and gearbox on this side of the bike, it's been down the road at least once in it's 90 years!
The magneto will have a similar resistance to a small dynamo or alternator, not massive. I just know if that chain slips, comes off or breaks, there''s no way to limp the bike home or anything. It's not the sort of thing I want to take chances on.
I had considered trying to build the teeth up with weld, then grinding them back to shape. With it being a duplex sprocket I could use the other row of teeth as a pretty accurate template for the grinding. Alternatively I could 'retooth' the sprocket, that would mean turning this sprocket down, cutting all the teeth off it, and then welding a new ring of teeth to the remaining centre section. This is a common thing with the pre-war bikes, and I'm currently attempting this with the rear wheel sprocket (more on that when I've typed up the rest of the work!) So I'll see how that goes and consider my options.
|
| |
Last Edit: Feb 14, 2024 12:20:42 GMT by goldnrust
|
|
glenanderson
Club Retro Rides Member
Posts: 4,121
Club RR Member Number: 64
|
|
Feb 14, 2024 12:31:15 GMT
|
|
A bearing/transmission factors might be able to help you with chain and sprockets.
If the magneto works well, and the dynamo generates enough power for your intended usage, then it’s probably best to soldier on with the standard system. If it’s in need of attention though, it might be worth considering a move to a self generating Cdi system and a more modern alternator. Someone with your abilities should be able to adapt an inexpensive modern rotor/stator setup to fit.
|
| |
My worst worry about dying is my wife selling my stuff for what I told her it cost...
|
|
misteralz
Posted a lot
 I may drive a Volkswagen, but I'm scene tax exempt!
Posts: 2,344
|
|
Feb 14, 2024 20:06:01 GMT
|
|
Duplex chain and loads of teeth? I wouldn't be worried about chain slip at all - it's not like you're driving loads of things off that. I'd be inclined to leave it as it is. Multiple overhead cams on a V engine would give me pause for thought. A magneto on a wee bike engine? Considerably less so. It'll be fine.
|
| |
|
|
|
|


 I think seeing the headlight moving about will be very weird to start with!